5 Best Hangboards for Home Wall Setup — Ranked & Reviewed
A hangboard is the highest-return investment in a home climbing setup. One board, mounted in a door frame or on a wall, gives you more finger-strength training value per square foot than any other piece of gear you can buy. These are the five best options available right now — ranked by hold quality, wood type, edge precision, and value — with full reviews, a side-by-side comparison, and an installation guide for first-timers.
⚡ Bottom Line Up FrontThe Metolius Simulator 3D is the best home wall hangboard for most climbers. It covers every hold type a structured training programme needs — three-dimensional slopers, two-finger pockets at three depths, pinches, and a comprehensive edge rail system — on a 23-inch wide dual-texture board that works equally well for beginner and advanced sessions. For climbers who want the absolute pinnacle of edge precision and wood quality, the Beastmaker 2000 is the board elite British and European sport climbers train on — more expensive, more specific, unmatched for systematic edge work. For first-time buyers on a tighter budget, the Metolius Wood Grips II removes the learning curve and gives you everything you need for a first year of structured training without overwhelming hold options.
$50–$220Price range of the five boards in this guide
20–31″Width range — mount width matters more than buyers expect
8–31+Hold count range — from focused beginner to elite multi-hold boards
Why a Home Hangboard is the Best Climbing Investment
More training value per square foot, per dollar, and per minute than any other piece of home climbing equipment.
Why a Home Hangboard is the Best Climbing Investment
Every serious climber eventually reaches the same conclusion: the limiting factor in their climbing is finger strength. Route technique, footwork, route reading — these improve naturally with climbing volume. Finger strength does not. Tendons adapt far more slowly than muscles, and the loading patterns at the gym — varied, interrupted, often insufficient — are rarely structured enough to drive the systematic tendon adaptations that produce real strength gains.
A home hangboard changes this equation fundamentally. It gives you a dedicated, consistent, quantifiable training tool that you can use on your own schedule, with your own protocol, on exact hold types you choose. The climbers who improve fastest are almost universally the ones who hang a board at home and use it consistently — not the ones who climb the most sessions at the gym.
The case for a home wall setup over gym-only training rests on three factors:
Frequency: A 15-minute hangboard session at home five days a week outperforms two 90-minute gym sessions for finger strength development. Tendons respond best to frequent, moderate loading — not infrequent maximum efforts. A home board makes this frequency practically achievable.
Consistency: Gym hangboards are shared, often occupied, and frequently located inconveniently relative to warm-up equipment. Your home board is always available, always at the right height, always with the holds you need. The friction removed from training consistency has a compounding effect over months.
Specificity: You choose exactly which holds to train on. If your weakness is two-finger pocket strength on the ring-middle combination, you train that exact position systematically. The gym’s fixed-height, shared board rarely allows this level of session specificity.
The investment required is modest. A good hangboard costs $60–150. Installation is a single afternoon. The training return — measured in climbing grades — is higher than any gym membership upgrade, equipment purchase, or coaching investment of similar cost. If you’re serious about climbing progression, a home board is not optional equipment. It is the foundation.
💡
Time-to-grade improvement: Most climbers who begin a structured home hangboard protocol (two sessions per week at beginner intensity) notice measurable improvements in finger strength within 6–8 weeks. Redpoint grade improvements typically follow within 3–4 months of consistent use. These timelines assume correct protocol — see the First Hangboard Protocol section below.
📋
Buying Guide
What to Look For in a Home Wall Hangboard
Seven variables that determine whether a board will serve your training for years — or frustrate you within weeks.
What to Look For in a Home Wall Hangboard
The hangboard market has exploded in the last decade, and with it the range of quality — from precisely engineered training tools used by professional climbers to cheap injection-moulded plastic boards that will damage your skin and distort your technique. Before examining specific boards, understand the variables that actually determine value:
📐 The 7 Critical Variables
Material — Wood vs Polyurethane vs Plastic: Wood is the gold standard for home boards. It is skin-friendly for high-volume sessions, self-texturing over time, and produces consistent edge feel across humidity changes. Polyurethane (used by Metolius) is an excellent second choice — consistent texture, durable, and slightly grippier than wood when chalked. Plastic should be avoided for any board you’ll hang indoors — it’s hard on skin and acoustically unpleasant for long sessions.
Edge depth range: The most important training variable. A board needs at minimum a 20mm and a 14–15mm edge for a complete beginner-to-intermediate programme. Elite boards extend down to 8–10mm. Boards that only offer “shallow” and “deep” without labelled depths cannot support systematic minimum-edge progression — a fundamental training method.
Hold variety: A complete home board should offer: at least two edge depths, at least one sloper, two-finger pockets (ideally at two depths), and optionally a jug rail for warm-up. A board that covers only edges, or only pockets, forces you to supplement it or limits your programme significantly.
Board width: Shoulder-width training position (roughly 20–24 inches between hand centres) is the ergonomically correct position for most hangboard exercises. Boards narrower than 20 inches force a cramped shoulder position. The best boards are 22–31 inches wide — always check before buying.
Edge geometry and fillet radius: Sharp-edged pockets and edges cause skin damage and incentivise crimp-only technique. Properly filleted (rounded) pocket rims allow open-hand grip and extend session length. Look for R3–R5 fillet radius on pocket rims in the product specifications or reviews.
Mounting system: Standard wall mounting (screwed through a wooden mounting board into studs or a plywood panel) is the most stable and recommended method for home walls. Door-frame specific boards are a compromise — useful for renters, but they limit the width and height you can position the board and typically allow only bodyweight loading without weighted hang capability.
Dual texture: The best boards offer two surface textures — a rougher texture on smaller holds for friction, a smoother texture on larger holds for skin comfort during warm-up and volume training. Single-texture boards make one compromise or the other.
⚠️
Avoid plastic boards for home installation. Cheap plastic hangboards from unbranded Amazon sellers dominate the search results but deliver poor edge consistency, sharp rim geometry that damages skin, and a slippery surface that becomes dangerous when damp. The $30–40 savings versus a quality board is negligible compared to the difference in training quality and injury risk. The boards reviewed below are all quality products from established brands.
🤏
Training Knowledge
Hold Types Explained
What each hold type trains, which ones matter most, and how to read a board’s hold inventory before you buy.
Hold Types Explained — From Jug to Mono
Understanding hold terminology lets you evaluate a board’s training value from its specification sheet, rather than relying on photos alone. Here are the six hold types you’ll encounter on a home board and what each one contributes to your training:
🟩
Jug / Rail
Full-hand horizontal hold. Used for warm-up hangs and pull-up movements. No finger-strength training value but essential for joint preparation before moving to smaller holds.
All Levels — Warm Up
📏
Edge (Various Depths)
Horizontal ledges from ~5mm (razor) to ~25mm (comfortable). The primary training hold for systematic minimum-edge protocols. Most important hold type on any board.
Intermediate → Elite
⭕
Sloper
Rounded, incut-free hold. Trains open-hand contact strength and wrist position control. Critical for boulderers but often neglected by sport climbers. Harder to train on small boards.
Intermediate+
✌️
Two-Finger Pocket
Deepest: index-middle or ring-middle combination. Shallower: two-finger crimp positions. The most specific finger-strength training hold. Essential for route climbers.
Advanced — High Injury Risk
☝️
Mono Pocket
Single-finger pocket. Elite training hold for climbers specialising in pocket routes (Frankenjura, Ceuse). Extremely high injury risk — only for climbers with years of tendon conditioning.
Elite Only
🤏
Pinch
Opposing thumb-and-finger grip. Trains a different muscle group (thumb flexors, adductors) than all other hold types. Often absent from entry-level boards but important for comprehensive strength.
Intermediate+
ℹ️
Which hold types do beginners actually need? A beginner’s first year of hangboard training should be conducted almost entirely on edges (20–25mm) and the jug rail for warm-up. Two-finger pockets should not be loaded by climbers with less than 18 months of consistent climbing — the A2 pulley is not yet conditioned for pocket loading. Slopers can be introduced at 6–12 months. Mono training should only begin after 3+ years of structured climbing. This is not caution for caution’s sake — it reflects the tendon adaptation timeline documented in sports medicine literature.
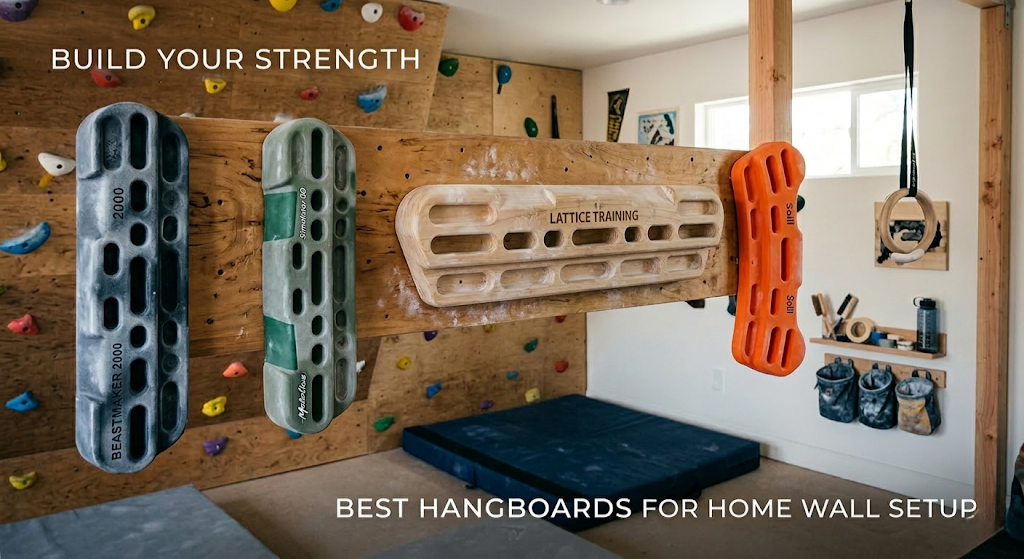
#1 — Best Overall Home Hangboard
1
🏆 #1 Best Overall
Metolius Simulator 3D Hangboard
The industry standard all-rounder. 23 inches wide, 31 holds, three-dimensional slopers, dual texture, and a hold inventory that supports every training protocol from beginner through advanced — all in polyurethane that outlasts wood in humid environments.
~$65–75
23″ Wide31 HoldsDual Texture Polyurethane~3.5 lbs
📐 What You Get
The Simulator 3D is Metolius’s flagship board and the most widely recommended hangboard in climbing coaching circles. At 23 inches wide, it gives you proper shoulder-width hand placement for all exercises. The 31 holds include: a full-hand jug rail across the top for warm-up, four distinct edge depths (roughly 20mm, 14mm, 10mm, and 7mm), three-dimensional slopers (meaning they have positive, neutral, and negative angle faces rather than flat sloper surfaces), two-finger pockets at two depths (deep and shallow), a four-finger open-hand pocket, and a generous pinch rail. The dual texture — rougher on smaller holds, smoother on the jug rail — is a thoughtful design detail that most single-texture boards lack.
🎯 Why It’s #1
No other board in this price range offers this combination of hold variety, training specificity, and build quality. The three-dimensional slopers are a genuine differentiator — flat sloper boards train contact strength in one wrist position; the 3D slopers train three angles with a single board. The polyurethane construction is a deliberate choice over wood for durability in humid environments (garages, basement walls) and consistent texture regardless of how often you use it. The edge depths cover the complete beginner-to-advanced training range. The 23-inch width is exactly right for the ergonomics of pull-based fingerboard exercises. For most climbers, this board will not be outgrown.
23″Width
31Holds
4Edge Depths
DualTexture
✓ Pros
Most complete hold inventory for the price — 31 holds covering every position
3D slopers are unique at this price point — no flat-face compromise
Dual texture throughout — rough on small holds, smooth on jugs
23-inch width — correct shoulder-width training ergonomics
Polyurethane outlasts wood in humid or outdoor environments
Used in coaching programmes worldwide — extensive protocol literature
Consistent feel across temperature and humidity changes
✗ Cons
Polyurethane is slightly harder on skin than quality wood for very high-volume sessions
Edge depths not engraved/labelled — requires measuring to confirm progression
No mono pocket — not suitable for specific single-finger training programmes
Mounting board sold separately — add $15–25 to total cost
Heavier than wood boards at the same size (~3.5 lbs)
Bottom line: The right board for the vast majority of climbers. Complete hold set, best-in-class sloper design, durable polyurethane, perfect width. Buy this unless you have a specific reason to choose otherwise.
#2 — Best Premium / Elite Hangboard
2
⭐ #2 Best Premium
Beastmaker 2000 Hangboard
The board of choice for elite British and European sport climbers. CNC-milled from a single sycamore block, with a precisely engineered hold profile that has been the standard for minimum-edge training since it was designed in partnership with the UK climbing coach community.
~$180–220
~22″ WideSycamore WoodCNC Single BlockApp Support
📐 What You Get
The Beastmaker 2000 is CNC-milled from a single solid block of sycamore — no splicing, no gluing, zero delamination risk. The hold profile is the result of systematic design with the UK competition climbing community: the board offers edges at 8mm, 10mm, 14mm, and 20mm (all precisely machined and labelled by position on the dedicated Beastmaker app), two-finger pockets at deep and shallow depths for ring-middle and index-middle combinations, a mono pocket at each side for elite single-finger work, a small sloper section, and a comfortable open-hand warm-up rail. The Beastmaker app (free, iOS and Android) provides guided timer-based sessions specifically designed for the board’s hold positions, with beginner through elite programmes.
🎯 Why It’s #2
The Beastmaker 2000 is #2 rather than #1 for one reason: price. At $180–220, it costs 2.5–3× as much as the Simulator 3D for a hold set that is more specialised rather than more comprehensive. The 2000 series is the advanced version (1000 series is beginner-focused); its 8mm and 10mm edges require well-conditioned tendons to use safely, and the mono pocket requires elite-level conditioning. It is the superior board for a climber operating at Font 7b/8a or V8+ who wants the most precise systematic edge training available. For a climber in their first 2–3 years, the Simulator 3D is a better investment. The sycamore wood construction is exceptional for skin and feels noticeably more pleasant than polyurethane for very high-volume sessions.
~22″Width
8–20mmEdge Range
YesMono Pocket
AppProtocol Support
✓ Pros
Best edge precision in any hangboard — machined to exact depths
Single-block sycamore — exceptional skin feel for high-volume sessions
Free Beastmaker app with structured timer programmes for all levels
Mono pocket for elite single-finger training
The board used by most UK and European competition climbers
No delamination risk — single-piece construction lasts decades
Precise enough for minimum-edge progression tracking
✗ Cons
Most expensive board in this guide (~$180–220)
8mm and 10mm edges are not beginner-safe — injury risk for unconditioned tendons
Fewer sloper options than the Simulator 3D
Narrower hold variety for climbers who train pinch strength
Premium price requires import shipping from UK for many buyers
Bottom line: The best hangboard money can buy for systematic edge training. Buy this if you’re at Font 7b+ or V8+ equivalent and want the most precisely engineered board available. For most climbers, the Simulator 3D is the smarter buy.
#3 — Best Hangboard for Beginners
3
🌱 #3 Best Beginner
Metolius Wood Grips II Hangboard
The most beginner-accessible board in the Metolius line. Smooth Douglas fir construction, conservatively designed hold profile with nothing smaller than a 14mm edge, and a 20-inch width that fits most door frames. The correct first hangboard for most new climbers.
~$55–65
20″ WideDouglas Fir Wood8 Hold TypesDoor-Frame Friendly
📐 What You Get
The Wood Grips II is milled from smooth Douglas fir — characteristically softer on skin than sycamore and exceptionally comfortable for early sessions when skin conditioning is still developing. The hold profile is deliberately restrained: a full-hand jug rail, two edge depths (20mm and 14mm), a pair of deep two-finger pockets, a pair of open-hand four-finger pockets, and a shallow sloper. The absence of holds smaller than 14mm is intentional — this board is engineered for the beginner-to-intermediate training range where the injury risk of small holds is highest and most unaware climbers get hurt. At 20 inches wide, it fits most standard door frames and can be mounted on a doorframe pull-up bar with an adapter.
🎯 Why It’s #3
The Wood Grips II earns #3 on the basis of what it gets right for its target buyer: nothing here will hurt a beginner who uses it as directed. The 14mm minimum edge is large enough for a first-year climber’s tendons to handle safely. The wood is skin-friendly for sessions when skin is still hardening. The 20-inch width is appropriate for the training volume beginners should be doing. It is genuinely the safest first hangboard available from a reputable manufacturer. Its limitation is the ceiling — a climber past the 18-month mark will want smaller edges and more hold variety, and will need to upgrade to the Simulator 3D. Think of this as a two-year board, not a lifetime board. For a first-time buyer who wants to start training and not overthink the purchase, it is the right choice.
20″Width
14mm+Min Edge
8Hold Types
FirWood Type
✓ Pros
Safest beginner board from a reputable brand — nothing smaller than 14mm
Douglas fir — softest, most skin-friendly wood in this guide
20-inch width fits standard door frames without modification
Lower price point — correct cost for a first board that will later be supplemented
Clean, uncluttered hold profile — no confusion about which holds to use
Metolius quality control — consistent across the range
✗ Cons
No edges smaller than 14mm — outgrown by intermediate climbers
Minimal sloper training options
No pinch holds for thumb flexor development
20-inch width is at the narrow end for advanced shoulder-width training
A step-up purchase (Simulator 3D) will likely follow within 12–24 months
Bottom line: The right first board for climbers in their first 18 months. Safe, skin-friendly, correctly designed for beginner loading. Plan to supplement with a Simulator 3D when you outgrow the edges.
#4 — Best Mid-Range Hangboard
4
🔷 #4 Best Mid-Range
Two Stones CJ-HB2002BX Hangboard
A compact CNC-milled wood hangboard with 14 holds — two edge depths, deep and shallow two-finger pockets, an open-hand four-finger pocket, and a jug rail — at one of the best price-per-hold ratios in the home wall category.
~$35–45
~19″ WideCNC Wood14 HoldsJug Rail Included
📐 What You Get
The Two Stones CJ-HB2002BX is a CNC-milled solid wood hangboard approximately 19 inches wide with 14 distinct holds — a full-hand jug rail across the top, two edge depths (roughly 20mm and 14mm), a pair of deep two-finger pockets, a pair of shallow two-finger pockets, a four-finger open-hand pocket, and two single-finger pockets for climbers who want to introduce mono training cautiously. All pocket rims are filleted for open-hand grip compatibility. The wood surface is lightly textured — slightly smoother than the Metolius polyurethane, closer to the Beastmaker sycamore in feel. At its price point (~$35–45), no other board offers this many hold types.
🎯 Why It’s #4
The CJ-HB2002BX earns #4 on value alone. At $35–45 it undercuts every other board in this guide while delivering a hold set that covers all the positions a beginner-to-intermediate training programme needs — jug warm-up, two edge depths, both two-finger pocket depths, and an open-hand pocket. It is the correct choice for a climber who wants to get started on a real training board without the $65–75 outlay of the Simulator 3D, or who wants a second board for a home wall supplementing an existing setup. Its limitation versus the Simulator 3D is edge depth range (no edges below ~14mm) and the absence of 3D slopers — but at this price, those omissions are entirely reasonable. A Two Stones portable board user will also recognise the familiar CNC wood quality and filleted geometry from the travel line.
~19″Width
14mmMin Edge
14Hold Count
WoodMaterial
✓ Pros
Best price-per-hold in this guide — 14 holds at ~$35–45
Jug rail included — proper warm-up without compromise
Deep and shallow two-finger pockets — covers both pocket training depths
CNC wood construction — same quality feel as the Two Stones travel range
Filleted pocket rims — open-hand grip compatible throughout
Ideal second board or budget first board
✗ Cons
No edges below ~14mm — not suitable for advanced minimum-edge protocols
No 3D slopers — contact strength training limited
~19″ width is narrower than ideal for shoulder-width training
Less brand recognition than Metolius or Beastmaker in coaching literature
No dedicated app or protocol library for this specific board
Bottom line: Best value board in this guide. 14 holds including a jug rail, two pocket depths, and CNC wood construction at ~$35–45. The right choice for budget-conscious buyers or as a second board supplementing a more advanced setup.
#5 — Best Wood Budget Hangboard
5
🔧 #5 Best Wood Budget
POWER GUIDANCE Rock Climbing Hangboard
A solid CNC-milled wooden hangboard covering the essential hold types — edges, two-finger pockets, slopers, and a jug rail — at a price that makes it one of the most accessible quality wood boards available on Amazon right now.
~$40–55
CNC WoodJug RailMultiple Hold TypesWall Mount
📐 What You Get
The POWER GUIDANCE hangboard is CNC-milled from solid wood with a hold layout covering the core training positions: a full-hand jug rail for warm-up, two edge depths for systematic minimum-edge progression, a pair of two-finger pockets, an open-hand four-finger pocket, and a sloper section. The wood surface is lightly sanded for skin comfort — smooth enough for volume sessions, textured enough to hold chalk well. Wall mounting uses standard screws through the rear flange onto a plywood panel or directly into studs. At its price point it competes directly with the Two Stones CJ-HB2002BX and the Metolius Wood Grips II — and holds its own on build quality against both.
🎯 Why It’s #5
The POWER GUIDANCE board earns #5 as a strong value wood alternative for climbers who want natural wood feel without stretching to the Beastmaker price tier. It covers every hold a beginner-to-intermediate training programme requires — jug warm-up, working edges, pocket training, and sloper contact — in a single board at $40–55. It sits behind the Two Stones CJ-HB2002BX at #4 primarily because the Two Stones offers more hold count at a similar or lower price; however, climbers who specifically prefer the feel and aesthetic of a traditional solid wood board will prefer this over the Two Stones. It’s the correct fifth-place pick: a quality product at an accessible price that fills the guide’s wood-budget gap.
WoodMaterial
CNCMilling
YesJug Rail
~$40–55Price
✓ Pros
Solid wood construction — skin-friendly for volume sessions
Jug rail included — proper joint warm-up before smaller holds
Covers all essential beginner-to-intermediate hold types
CNC-milled — consistent edge geometry throughout
Strong value at $40–55 for a real wood board
Clean, traditional aesthetic suits most home wall setups
✗ Cons
Edge depths not as precisely labelled as Beastmaker or Simulator 3D
No edges below ~14mm — not suitable for advanced minimum-edge work
Fewer total holds than the Two Stones CJ-HB2002BX at a similar price
No dedicated training app or protocol library
Sloper quality is functional but not on par with the Simulator 3D’s 3D slopers
Bottom line: A solid wood board at a budget price covering all essential training positions. Best for climbers who specifically want natural wood feel and aren’t ready to step up to the Metolius or Beastmaker tier.
Side-by-Side Comparison Table
All five boards compared across the variables that matter most for a home wall purchase decision:
← scroll to see full table →
Board
Price
Width
Material
Min Edge
Slopers
Best For
🏆 Metolius Simulator 3D
~$65–75
23″
Polyurethane
~7mm
3D (best)
Most climbers, all levels
⭐ Beastmaker 2000
~$180–220
~22″
Sycamore
8mm (labelled)
Flat sloper
Advanced / elite edge training
🌱 Metolius Wood Grips II
~$55–65
20″
Douglas Fir
14mm (safe)
Shallow only
Beginners, first 18 months
🔷 Two Stones CJ-HB2002BX
~$35–45
~19″
CNC Wood
14mm (safe)
None
Budget buyers, second boards
🔧 POWER GUIDANCE Hangboard
~$40–55
Standard
CNC Wood
~14mm
Yes
Wood feel, budget price
Category Performance at a Glance
Category
🏆 Sim 3D Metolius
⭐ BM 2000 Beastmaker
🌱 WG II Metolius
🔷 Two Stones CJ-HB2002BX
🔧 POWER G Guidance
Hold Variety
★★★★★
★★★☆☆
★★★☆☆
★★★☆☆
★★★★☆
Edge Precision
★★★☆☆
★★★★★
★★★☆☆
★★★★☆
★★★★☆
Skin Comfort
★★★☆☆
★★★★★
★★★★★
★★★★☆
★★★★☆
Value for Money
★★★★★
★★☆☆☆
★★★★☆
★★★☆☆
★★★☆☆
Beginner Safety
★★★★☆
★★☆☆☆
★★★★★
★★★☆☆
★★★☆☆
Sloper Quality
★★★★★
★★★☆☆
★★☆☆☆
★★★☆☆
★★★★☆
Long-Term Value
★★★★☆
★★★★★
★★☆☆☆
★★★☆☆
★★★★★
🔨
Step-by-Step
Home Wall Installation Guide
Correctly installed, a hangboard will support decades of loaded training. Incorrectly installed, it will fail at the worst possible moment. Here’s how to do it right the first time.
Home Wall Installation Guide
A hangboard installation that fails during training — whether the studs pull out, the mounting board cracks, or the board itself splits — can cause serious injury. The installation is not difficult, but it requires the right approach and the right materials. This guide covers the two main installation methods: stud-mounted wall installation (the most stable and recommended method) and door-frame installation (for renters and spaces where wall drilling isn’t possible).
Use a stud finder (under $20 at any hardware store) to locate the wall studs in your chosen installation location. Studs are typically 16 inches apart in North American construction, 18–24 inches in European construction. Mark both edges of each stud clearly — the centre of the stud is where your screws go. Never hang a board from drywall alone — drywall anchors are not rated for the dynamic loading of fingerboard training. You need studs, or a full plywood panel spanning multiple studs (see Step 2).
2
Build Your Mounting Board (Strongly Recommended)
The standard installation method is to first mount a ¾-inch (18mm) plywood panel, minimum 24 × 24 inches, onto the wall studs using 3-inch structural screws (minimum 4 screws into solid studs). Then mount your hangboard onto this plywood panel. This approach distributes load across a larger wall area, allows you to mount the board at exactly the right height regardless of stud placement, and protects the wall. Do not screw a hangboard directly into drywall, even with the largest available anchors — the shear load of hanging and pulling is too high for drywall anchors over time.
3
Set the Correct Height
Board height is the variable most installations get wrong. The correct height places your elbows at approximately 90 degrees when hanging on the deepest pockets with arms fully extended — typically achieved with the board’s top edge at 8–9 feet (240–270cm) for most adults. Too low forces hunched shoulders and compromises shoulder mechanics. Too high creates excessive reach and prevents a correct hanging position. If you’re mounting for multiple users of different heights, compromise at the taller user’s optimal height — shorter users can step up.
4
Pre-Drill and Mount with Structural Screws
Always pre-drill pilot holes in the hangboard’s mounting flange using a drill bit slightly smaller than your screw diameter — this prevents wood splitting. Use 2.5-inch (65mm) structural screws with washers at every mounting hole. Apply thread-locking compound to prevent vibration loosening over time. Check that the board doesn’t wobble at all after installation — any movement under load indicates an insufficiently secured mount. Tighten until completely rigid, then test by hanging your bodyweight and pulling in multiple directions before beginning any training session.
5
Test Load Before Training
Before running any training session on a new installation, perform a deliberate progressive load test: hang lightly (hands only, feet still on ground) for 10 seconds, then full bodyweight for 30 seconds, then dynamic loading (small pulls and body movements) for 30 seconds. Check the wall around the mounting screws for any cracking or movement of the plywood panel. If the installation is solid under this test, it is safe to begin training. Recheck the screws after the first month of use — wood compression under load can cause slight settling that requires tightening.
Method 2 — Door Frame Installation (Renters)
Door frame installation is a viable alternative for renters or climbers who cannot drill into walls. The compromise is load capacity and board positioning flexibility. Here’s how to do it safely:
Use a pull-up bar rated for the task: A standard tension-mounted pull-up bar (the push-and-twist style) is not adequate for a hangboard. Use a heavy-duty pull-up bar that screws into the door frame moulding — rated 300+ lbs and designed for hanging load, not just pull-ups.
Check the door frame construction: Solid wood door frames can support hangboard load. Hollow-core MDF surrounds common in modern apartments cannot. Test by pressing firmly on the frame — solid wood won’t flex. If it flexes or sounds hollow, do not mount a hangboard here.
Use a hangboard adapter: Several manufacturers (Metolius, Moon Climbing) make door-frame adapters — curved wooden brackets that sit over a pull-up bar and provide a mounting surface for a hangboard. These are preferable to attempting to hang the board directly from a bar.
Weight limit is lower: Door-frame installations should not be used for weighted hangs (harness + weight belt training) — stick to bodyweight only.
⚠️
Never hang a board from a door frame using ropes over the top of the door. The door frame’s top is not load-rated and the rope creates a lever arm that multiplies the force on the hinge side of the frame. This installation method has been responsible for door frame failures and falls. Use only purpose-designed pull-up bars or stud-mounted installations.
📈
Protocol Guide
Your First Hangboard Protocol
The exact programme to follow in your first 8 weeks — based on the most widely recommended beginner hangboard method in strength and conditioning coaching.
Your First Hangboard Protocol
The most important principle of beginner hangboard training is one that almost every new user violates: do less than you think you should. Tendons adapt 3–4× more slowly than muscles. You will feel like you could do more after the first session. You should not. The training stimulus that produces long-term tendon strength adaptation is moderate load applied consistently over weeks — not maximal load applied occasionally. The climbers who sustain finger injuries from hangboarding almost universally loaded too heavily, too soon.
The 7/3 Repeater Method — The Standard Beginner Protocol
The 7/3 repeater method is the most widely used and evidence-supported beginner hangboard protocol. The name refers to the timing: 7 seconds of hanging, 3 seconds of rest, repeated in sets. Here is the complete first-session programme:
📋 Week 1–2: Foundation Protocol
Warm-Up5–10 min light movement + jug rail hangs (easy, low load)Do not skip warm-up — tendons are avascular and slow to warm
Hold20mm edge (deep) — half-crimp grip onlyDo not use full crimp in the first month
Timing7 seconds on / 3 seconds rest× 6 repetitions = 1 set
Sets3 sets per session3 minutes rest between sets
Frequency2 sessions per weekNever on consecutive days in the first month
Intensity70% of maximum — never failureIf you can’t complete 6 reps, the hold is too small
📋 Week 3–4: Building Volume
Hold20mm edge + introduce 16–18mm edgeHalf-crimp only — no full crimp yet
Sets4 sets per hold type (2 × 20mm, 2 × 16mm)3 minutes rest between sets
Frequency2–3 sessions per weekMinimum 48 hours between sessions
New this weekOpen-hand grip on deep pockets1 set only — introduce carefully
GripsHalf-crimp and open-hand in all setsFull crimp introduced only if shoulder / elbow pain-free
Volume4–5 sets per session, 3 sessions per weekSessions should not exceed 35 minutes including warm-up
Progression ruleMove to smaller edge only when current edge feels controlled for all 6 reps × 4 setsNever progress edge depth and volume simultaneously
💡
The most important rule in all hangboard training:Never train through finger pain. Muscle soreness is expected and acceptable. Any sharp, specific pain in the finger tendons, particularly the A2 pulley region (base of the ring or middle finger), is the signal to stop, rest for 5–7 days, and reassess. A2 pulley injuries caused by premature or excessive hangboard loading are the single most common training injury in climbing — and almost always preventable with correct protocol adherence. See the full Rock Climber’s Training Bible for advanced protocol progression beyond 8 weeks.
Which One Should You Buy?
🎯 Decision Guide by Climber Type
First hangboard, beginner climber (under 18 months experience) — buy the Metolius Wood Grips II. The safest and most skin-friendly entry point. Nothing on this board can hurt you if you follow the beginner protocol. Plan to supplement with the Simulator 3D at the 18–24 month mark.
Most climbers, intermediate level — buy the Metolius Simulator 3D. Best hold variety, best sloper design, correct width, best value. The right answer for the majority of buyers at any level above complete beginner. If in doubt, this is the board to get.
Advanced or elite climbers (Font 7b+ / V8+) focused on edge training — buy the Beastmaker 2000. The most precise edges available, single-block wood construction, app support. Worth the premium for climbers who will actually use the 8–10mm edges and who want systematic edge data.
Budget-conscious buyers or those wanting a second board — buy the Two Stones CJ-HB2002BX. 14 holds including a jug rail and dual pocket depths at ~$35–45 makes this the strongest value option in the guide. A solid first board for climbers not ready to commit to the Simulator 3D price, or an excellent supplementary board for an existing home wall.
Climbers who want natural wood feel at a budget price — buy the POWER GUIDANCE Hangboard. Solid CNC wood, jug rail, all essential hold types covered at $40–55. The right choice if you specifically want a traditional wood board and don’t want to spend Beastmaker money.
Travelling climbers who also want a home board — buy the Simulator 3D for home + a Two Stones portable for travel. The portable board guide covers the best travel options.
✓ Final VerdictFor the broadest range of climbers, the Metolius Simulator 3D is the correct choice — it’s the board that Metolius’s best designers built for a complete training programme, and it shows in the hold inventory, the sloper design, the dual texture, and the width. Beginners should start with the Wood Grips II. Elites who want edge precision without compromise should move to the Beastmaker 2000. Everyone else should be on the Simulator 3D.
For beginners (first 3 months), two sessions per week with at least 48 hours between sessions is the evidence-based recommendation. For intermediate climbers running a structured programme, three sessions per week is the typical protocol. More than three dedicated hangboard sessions per week is counterproductive — tendons require 48–72 hours of recovery between loaded sessions to adapt positively. If you are also climbing at the gym or crag, count those days as loading days and reduce hangboard frequency accordingly. A climber who climbs three days a week and does two dedicated hangboard sessions is at risk of overloading the finger tendons — one or two hangboard sessions added to an existing climbing schedule is the typical sustainable maximum.
Yes — but less than the internet debates suggest. Wood is gentler on skin for high-volume sessions because it is slightly softer and self-textures over time (chalk and oil from your hands gradually conditions the surface). Polyurethane (Metolius) is more consistent — the texture doesn’t change with use, which some climbers prefer for training reproducibility. The practical difference becomes most apparent at session lengths over 45 minutes: wood users typically report less skin wear in long sessions. For most climbers doing 20–35 minute sessions two or three times a week, the difference is minor and should not be the deciding factor in a board purchase. The hold design, edge precision, and board width all matter more than material choice for most buyers.
Not safely for full-weight training. Drywall anchors — even the heavy-duty variety — are not rated for the shear loading of fingerboard training, particularly when adding bodyweight pulling and dynamic loading across sessions. Drywall anchor failures during training are a known hazard. If stud mounting is impossible (rented apartment, no identifiable studs), the correct approach is a door-frame pull-up bar installation with a hangboard adapter — as described in the installation guide above. This limits you to bodyweight hangs (no weighted training) but is the safe approach for stud-free installation. A third option for serious climbers in rented spaces is a freestanding wooden A-frame structure that requires no wall attachment — these can be built or purchased, support full training loads, and leave no marks on the wall.
The Beastmaker 1000 is the appropriate choice for intermediate climbers; the 2000 is designed for advanced-to-elite athletes. The difference is the hold profile: the 1000 series has larger edges (minimum approximately 18mm) and deeper pockets, while the 2000 has edges starting at 8mm and a mono pocket. An intermediate climber at Font 6c–7a or V4–V6 will spend most of their training time on the holds the 1000 covers well, and the 8mm edges on the 2000 create injury risk if a climber doesn’t yet have the tendon conditioning for them. The 1000 is also less expensive (~$130–160). If you’re choosing between Beastmaker boards: 1000 for intermediate, 2000 for climbers operating at Font 7b+ consistently.
All three grip positions train different aspects of finger strength, but they carry different injury risk profiles. Open-hand (fingers flat, no hyperextension) is the safest grip for training and should form the majority of your hangboard volume — it is the strongest grip position on slopers and large pockets on real rock. Half-crimp (second joint at 90 degrees, last joint straight) is the standard training position for edges and should be used for most of your edge training. Full crimp (last joint hyperextended, full pulley loading) produces the highest force on the A2 pulley and should be used conservatively — it’s a strong position for small edges in climbing, but the highest-injury-risk grip in hangboard training. The general protocol recommendation: beginners train open-hand and half-crimp only for the first 3–6 months. Intermediate climbers add full crimp on working edges once the tendons are conditioned. See the full protocol in the Rock Climber’s Bible.
The timeline for hangboard training to translate into measurable climbing improvement follows the tendon adaptation curve, which is well-documented in sports medicine. Finger strength increases (measurable on a dynamometer) typically appear within 4–6 weeks of consistent protocol training at correct intensity. Climbing performance changes — holding holds that previously pumped you off, sustaining friction on small footholds because your grip is no longer compensating — typically follow within 6–12 weeks. Grade improvements on redpoint routes require additional factors (technique, route reading, endurance) that hangboard training alone doesn’t address, so they vary more. Most climbers following a correct beginner protocol report their first clear performance improvement at the 8–10 week mark. Critically, this timeline assumes consistent training twice a week — sporadic or highly variable training produces no adaptation. The body adapts to repeated stimuli, not occasional ones.
The evidence supports hangboarding on climbing days (immediately before or after) rather than on separate rest days, for most climbers. The reasoning: hangboard training and climbing training both load the finger tendons, and training both in the same session concentrates the total weekly tendon load into fewer days — leaving more recovery time between tendon-loading sessions. If you hangboard before climbing: keep the session short (15–20 minutes), use larger holds only, and treat it as a progressive warm-up. If you hangboard after climbing: this is the preferred order for most protocols, as the warm-up from climbing improves tendon extensibility and the hangboard finishes the session with targeted stimulus. The approach to avoid: hangboarding on consecutive days regardless of whether those days include climbing — tendons need 48–72 hours of rest between loaded sessions, and stacking hangboard on top of previous-day climbing violates this requirement.
Portable and home wall boards are different product categories optimised for different use cases, and the compromises run in both directions. A portable board used as a home wall board is technically possible — the Two Stones CJ-HB2055BX can be hung from any pull-up bar installed at home. The limitation is the width (19.6″ versus 23″ for the Simulator 3D) and hold variety — portable boards lack the sloper quality and hold diversity of a full wall board. They work, but you’ll feel the compromises in long-term training. A home wall board used as a portable board is generally impractical — the Simulator 3D and Beastmaker are too large and heavy to travel with, and they require a wall mount rather than a rope anchor. The practical recommendation: own both — a home wall board as your primary training tool and a travel portable for trips. See the portable board guide for travel options starting under $35.
The Board is an Investment. The Protocol is Everything.
Every board in this guide is a quality product that will serve years of training if you install it correctly and use it with appropriate protocol. The difference between a climber who installs a hangboard and gets injured in six months and one who installs the same board and climbs a grade harder within a year is almost never the board — it’s the protocol. Conservative loading, consistent frequency, correct grip position, and absolute respect for finger pain signals are the variables that determine whether hangboard training makes you stronger or keeps you injured.
Install the board. Follow the beginner protocol for the first 8 weeks without deviation. Build from there. The improvement is coming — but tendons operate on their own timeline, and the only way to accelerate it is consistency, not intensity.