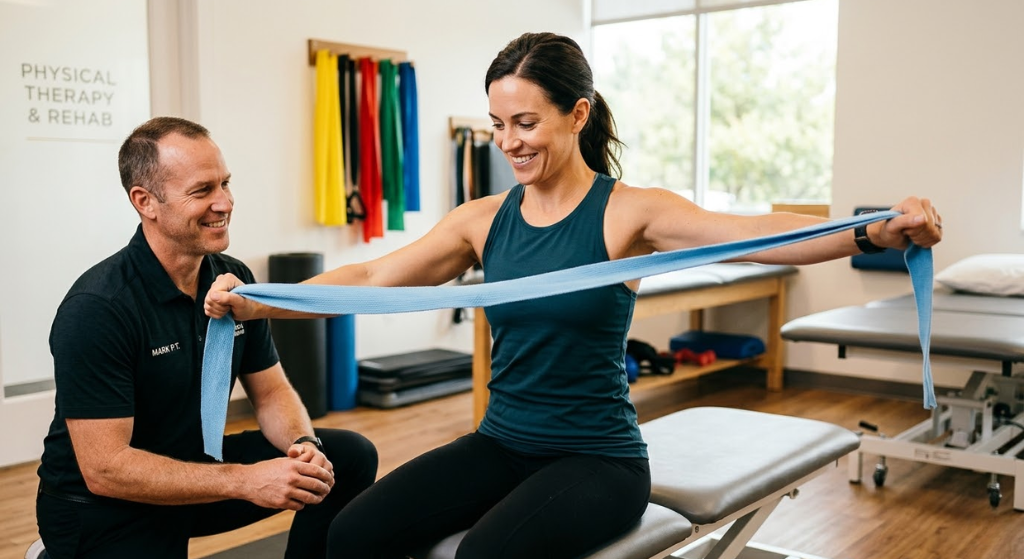
Why Resistance Bands Are Ideal for Rehab
The standard objection to band training — that resistance is too light and imprecise — inverts completely in a rehabilitation context. The very properties that limit bands for maximum strength development are the properties that make them the safest and most versatile rehab tool available.
⚡ The Key Mechanical Advantage
Bands provide ascending resistance — lightest at the start of a movement (where joints are most vulnerable and tissue most irritable) and heaviest at end-range (where muscles are strongest and most tolerant of load). This is the opposite of free weights, which provide maximum load at the weakest, most exposed joint positions. For post-surgical tissue, acutely injured tendons, and hypermobile joints, this resistance profile is not just convenient — it is clinically superior.
25+PT-validated band exercises across 5 body regions in this guide
Week 1Bands are safe to introduce in acute rehab when free weights are not
3–5Band resistance levels covers the full rehab range from acute to return-to-sport
Bands also allow multidirectional loading — something no free weight can replicate. A hip abductor can be loaded laterally, diagonally, or rotationally with a single fabric band repositioned at different anchor points. This multiplanar loading capacity is essential for joint stability rehabilitation, where the injury mechanism is often rotational rather than purely linear.
Band Selection for PT Use
Rehab band use differs from performance training in one critical way: resistance must be light enough to allow pain-free movement through the full therapeutic range. Many athletes make the mistake of using performance-weight bands in early rehab — this increases pain, provokes inflammation, and sets back recovery. For a detailed comparison of all band types, see Loop vs Tube vs Fabric Bands.
Type 1 — Rehab Primary
Loop Bands (Flat Latex)
Best for: Shoulder ER/IR, rows, pull-aparts, hip rehab, ankle strengthening, proprioception work. Most versatile rehab band — can be used for nearly every exercise in this guide. Use extra-light (5–15 lbs) in acute phase; progress to light and medium over weeks 4–12.
Type 2 — Upper Body Focus
Tube Bands (With Handles)
Best for: Shoulder external rotation (D1/D2 patterns), resisted rows, bicep curl strengthening in elbow rehab, proprioceptive diagonal patterns. The handles make precise grip positioning easier when shoulder or hand pain limits bare-band gripping.
Type 3 — Lower Body Focus
Fabric Mini Bands
Best for: Glute med activation, clamshells, hip abduction, lateral walks, ankle proprioception. The fabric material stays in place on skin without rolling — critical for hip and ankle exercises where band position must remain consistent throughout sets.
📋 Minimum Band Kit for This Rehab Guide
- 2× Extra-light loop bands (5–10 lbs) — acute shoulder, ankle, proprioception work
- 1× Light loop band (15–25 lbs) — shoulder strengthening, hip abduction, mid-range loading
- 1× Medium loop band (30–50 lbs) — knee and hip exercises in load phase (weeks 4+)
- 2× Fabric mini bands (light + medium) — glute, hip abductor, clamshell, lateral walk
- 1× Tube band set with handles — shoulder D1/D2 patterns, elbow rehab, diagonal movements
⚠️
This guide provides general exercise information consistent with published physiotherapy protocols. It is not a substitute for individual assessment and treatment by a registered physiotherapist. If you have had recent surgery, acute trauma, or significant pain (above 4/10) during exercise, consult a physiotherapist before beginning these exercises independently.
Shoulder & Rotator Cuff Exercises
Rotator cuff rehabilitation is the most common clinical application for resistance bands. The four cuff muscles — supraspinatus, infraspinatus, teres minor, and subscapularis — are difficult to isolate with free weights due to the weight of the dumbbell creating unintended deltoid recruitment. A light band anchored at the correct height allows precise cuff isolation without the deltoid compensation that limits free-weight cuff work. These exercises are appropriate for rotator cuff tendinopathy, impingement, partial tears (post-acute), and shoulder instability.
Shoulder & Rotator Cuff Exercises (6 Total)
EX 01
External Rotation — Side-Lying / Standing
Rotator Cuff · Impingement · Instability
Extra-Light Loop or Tube
Acute Phase
3Sets
15Reps
2-1-3Tempo
DailyFrequency
Anchor an extra-light band at elbow height. Stand sideways to the anchor, working arm closest to it. Elbow bent to 90°, tucked firmly to the side. Rotate the forearm away from the body (external rotation) against the band’s resistance, holding 1 second at end range before slowly returning over 3 seconds. This directly targets the infraspinatus and teres minor — the two primary external rotators that are almost universally weak in shoulder impingement and instability presentations.
How to Perform
- Anchor band at elbow height; stand sideways with working arm nearer the anchor
- Grip band, elbow bent 90° and pinned firmly to the side — elbow must not leave the body
- Rotate the forearm outward (away from body) over 2 seconds until end range
- Hold 1 second; slowly return over 3 seconds — resist the band’s pull back
✓ Key Cues
- A small rolled towel between elbow and side prevents the elbow drifting away from the body — this is the most common technique error
- Use the lightest band that provides any resistance — this is a precision exercise, not a strength exercise
- 3-second eccentric return is where most cuff remodelling stimulus comes from — don’t let the band snap back
↑ Progression
Weeks 1–3: Extra-light band, 3×15 daily. Weeks 4–6: Light band, 3×15. Weeks 6–10: Progress to prone external rotation and scaption (EX 03) once 3×15 is comfortable. The goal is not load — it is endurance and neuromuscular control of the cuff under fatigue.
EX 02
Internal Rotation — Band
Rotator Cuff · Post-Surgery
Extra-Light Loop or Tube
Acute Phase
3Sets
15Reps
2-1-3Tempo
DailyFrequency
Mirror of EX 01 — stand with the working arm further from the anchor, rotate the forearm toward the body. Targets the subscapularis. Always pair with external rotation — isolated internal rotation without ER strengthening creates muscular imbalance and worsens impingement. The IR:ER strength ratio is a key clinical marker in shoulder health assessment.
✓ Key Cues
- Pair with EX 01 every session — never train IR without ER in a rehab context
- Elbow pinned to the side as in EX 01 — same technique, opposite direction
- IR typically tolerates slightly more resistance than ER in most rotator cuff presentations — start lighter than you think
EX 03
Scaption — Band (Full Can)
Supraspinatus · Impingement
Extra-Light Loop
Acute → Intermediate
3Sets
15Reps
90°Max height
Stand on the band, feet shoulder-width apart. Arms at sides, thumbs pointing up. Raise both arms diagonally forward at 30–45° to the body’s midline (the scapular plane) to shoulder height only — not overhead. The scapular plane is the position of lowest impingement risk for supraspinatus loading. The thumb-up “full can” position is clinically preferred over the “empty can” (thumb down) for supraspinatus activation without impingement provocation.
✓ Key Cues
- Stop at 90° (shoulder height) — do not raise overhead in the acute or subacute phase
- The diagonal direction (30–45° forward of the frontal plane) is not optional — it reduces impingement risk compared to a standard lateral raise
- Thumbs pointing upward throughout — maintain “full can” position
EX 04
Band Face Pull — Shoulder Health
Impingement · Posture · Instability
Extra-Light Loop
Beginner
3Sets
20Reps
DailyFrequency
Anchor band at face height. Pull toward the face while rotating the hands upward (external rotation), finishing with thumbs pointing behind you. The combined horizontal row and external rotation motion replicates the PNF D2 diagonal pattern commonly used in shoulder rehab — strengthening rear deltoid, mid-trap, rhomboid, and external rotators simultaneously. One of the most efficient single exercises for shoulder impingement management.
✓ Key Cues
- The external rotation at the end of the pull is the key therapeutic component — don’t pull and stop at the face
- Use a very light band — this is a precision movement, not a strength exercise
- Can be done daily as a shoulder health maintenance exercise, not just in rehab phases
EX 05
Band Pull-Apart — Scapular Control
Impingement · Posture · Instability
Extra-Light Loop
Beginner
3Sets
20Reps
2sHold at end
Hold the band with both hands at shoulder width, arms straight in front at chest height. Pull both ends apart horizontally until the band touches the chest, squeezing shoulder blades together. The scapular retraction component is the primary therapeutic stimulus — it directly strengthens the mid-trapezius and rhomboids, the muscles most responsible for maintaining correct scapular positioning during overhead movements. Poor scapular control is the root cause of most shoulder impingement presentations.
✓ Key Cues
- Hold the retracted position for 2 seconds — feel both shoulder blades squeezing toward the spine
- Keep arms straight — bending the elbows converts this to a row and removes the scapular control stimulus
- Progress by moving hands closer together on the band (increases resistance) or using a slightly heavier band
EX 06
Diagonal PNF Pattern — D1 / D2
Rotator Cuff · Post-Surgery · Instability
Extra-Light Tube Band
Intermediate
3Sets
12/sideReps
SlowTempo
Anchor band low at ankle height on the opposite side. The D2 flexion pattern: start with the arm across the body (down and across), then sweep upward and outward to a position above and outside the shoulder. PNF diagonal patterns are the most functionally relevant shoulder rehab movements — they load the cuff through multiple planes simultaneously, replicating the movement demands of throwing, reaching, and overhead activities better than any isolated single-plane exercise.
✓ Key Cues
- Move slowly and with control throughout the full arc — this is not a power movement
- The shoulder should move through its full diagonal range — if any position provokes pain above 3/10, reduce range or band resistance
- Perform D1 (flexion-adduction-external rotation) and D2 (flexion-abduction-external rotation) patterns both
Knee Rehab Exercises
Band-based knee rehabilitation targets VMO strengthening, patellofemoral tracking, IT band syndrome, ACL/PCL protective loading, and general quad atrophy following injury or surgery. The key advantage of bands over free weights for early knee rehab: resistance can be applied in any direction — lateral, rotational, and diagonal loading patterns that are impossible to replicate with a dumbbell and essential for restoring knee joint stability.
Knee Rehab Exercises (5 Total)
EX 07
Terminal Knee Extension (TKE) — Band
Patellofemoral Pain · ACL Rehab · VMO
Light Loop Band
Acute Phase
3Sets
15–20Reps
2s holdAt lockout
3×/dayFrequency
Anchor a light band at knee height behind you. Loop it around the back of the knee. Stand facing away from the anchor, knee slightly flexed. Extend the knee to full lockout against the band’s resistance, holding hard for 2 seconds. The TKE directly targets the VMO (vastus medialis oblique) at the terminal 10–30° of knee extension where it is most active — the range that is most critical for patellofemoral tracking and most commonly inhibited following knee injury.
How to Perform
- Anchor band at knee height, loop it around the back of your knee, face away from anchor
- Stand with the working knee slightly flexed (10–20°), hip and ankle stacked
- Extend the knee fully to lockout — squeeze the quad hard, especially the inner VMO
- Hold 2 seconds at lockout, then slowly allow the band to pull the knee back to start position
✓ Key Cues
- Full extension is mandatory — partial lockout misses the VMO activation window
- Focus on feeling the inner quad (VMO) fire at the top — place a hand on the inner quad to provide tactile feedback
- Band tension should create moderate resistance at lockout, not maximum effort — this is a neuromuscular activation exercise, not a strength exercise in early phases
↑ Progression
Weeks 1–3: Light band, 3×15–20 three times daily. Week 4+: Add mini band above knees during banded squats (EX 08) alongside TKE. Progress to single-leg TKE when bilateral is pain-free. The TKE remains in the programme throughout all phases — it’s not just an early-stage exercise.
EX 08
Mini-Band Squat — Valgus Control
Patellofemoral Pain · PFPS · IT Band
Fabric Mini Band
Beginner
Place a fabric mini band just above both knees. Perform a controlled bodyweight squat, actively pushing the knees outward against the band’s resistance throughout the full movement. The band provides both a resistance stimulus for the glute med and hip abductors and a proprioceptive cue to prevent knee valgus — the most common and most damaging knee movement pattern in PFPS and ACL injury.
✓ Key Cues
- Actively drive the knees out against the band — don’t just allow them to stay neutral
- Slow 3-second descent is where the valgus control challenge is greatest — don’t rush the bottom
- If knee cave is unavoidable, reduce depth until hip strength improves
EX 09
Side-Stepping — Resisted
PFPS · IT Band · Knee Stability
Fabric Mini Band
Beginner
3Sets
15 steps/sideReps
Quarter squatPosition
Fabric mini band above knees or around ankles. Quarter squat position (hip and knee slightly flexed). Step laterally, maintaining constant band tension — don’t let the feet come together enough to release it. The hip abduction pattern during lateral movement directly loads the glute med in its functional role as a frontal-plane knee stabiliser — more specific than isolated clamshells for athletes returning to running and cutting movements.
✓ Key Cues
- Maintain the quarter squat throughout — standing upright removes the glute med challenge
- Bands at the ankle (longer lever arm) are harder than bands above the knee — progress from knee to ankle placement as strength increases
EX 10
Resisted Step-Up — Band
Quad Atrophy · ACL Rehab
Light–Medium Loop Band
Intermediate
3Sets
10/sideReps
3sEccentric
Stand on a loop band with the working foot on a step (15–20 cm). The band provides upward resistance at the hip, increasing quad demand. Step up to single-leg standing, then slowly lower the non-working leg back down over 3 seconds. The single-leg step-down (eccentric phase) is the most clinically relevant rehabilitation movement for quad strength and patellar tendon loading — used in both PFPS and patellar tendinopathy protocols.
✓ Key Cues
- The slow eccentric lowering is the therapeutic stimulus — the step-up is just how you reset for the next rep
- Working knee tracks over the second toe throughout — valgus drift means the exercise is too hard
- Progress step height from 10 cm → 20 cm → 30 cm as strength and control improve
EX 11
Hamstring Curl — Band
Hamstring Strain · ACL Rehab
Light Loop Band
Intermediate
3Sets
12–15Reps
3sEccentric
Anchor band low behind you, loop around the ankle. Lie prone. Curl the heel toward the glute against the band’s resistance, then lower slowly over 3 seconds. The band provides the most resistance at the shortened hamstring position (knee fully flexed) — complementary to the Nordic curl’s eccentric-dominant stimulus. Used in hamstring strain rehabilitation and as an ACL protective exercise by directly loading the hamstring co-contractors at the knee.
✓ Key Cues
- Pelvis stays flat on the floor throughout — hip elevation is a compensation for insufficient hamstring strength
- 3-second eccentric phase (lowering) is the key therapeutic stimulus for hamstring remodelling
- Can be performed standing (facing the anchor, curl heel toward glute) if prone position is uncomfortable
Hip & Glute Rehab Exercises
Hip and glute rehabilitation with bands addresses three primary clinical presentations: glute med weakness (contributing to knee valgus, hip pain, and lower back pain), hip impingement and labral pathology (where careful range control is essential), and post-surgical hip rehabilitation (hip replacement, labral repair). Fabric bands and extra-light loop bands are the tools of choice — they allow loading in the hip’s most functional movement planes with precision unavailable from free weights.
Hip & Glute Exercises (5 Total)
EX 12
Clamshell — Fabric Band
Glute Med · Hip Impingement · Knee Valgus
Fabric Mini Band (Light)
Acute Phase
3Sets
20/sideReps
2s holdAt top
DailyFrequency
Lie on your side, fabric band above the knees. Hips stacked at 45° flexion, knees bent, feet together. Rotate the top knee upward as far as possible without the pelvis rolling back, hold 2 seconds, lower with control. The clamshell is the primary glute med isolation exercise in physiotherapy — appropriate from day one of hip, knee, or lower back rehabilitation. The fabric band provides targeted resistance to the abduction movement while the side-lying position eliminates compensatory hip flexor recruitment.
How to Perform
- Lie on your side, hips at 45° flexion, knees stacked, fabric band just above both knees
- Keep the pelvis completely still — brace the core lightly before each rep
- Rotate the top knee upward (external rotation of the hip) as far as possible without the hip rolling back
- Hold 2 seconds at the top, then lower slowly — complete all reps before switching
✓ Key Cues
- The top-side hip must not rotate backward — place a hand on the top hip to detect any rolling
- Open as wide as possible without pelvic rotation — range of motion varies significantly between individuals
- Progress: light fabric band → medium fabric band → loop band anchored at waist height for standing clamshell
EX 13
Hip Abduction Standing — Band
Glute Med · Hip Stability · Knee Valgus
Fabric Band or Light Loop
Beginner
3Sets
15/sideReps
3sEccentric
Anchor band at ankle height, loop around the working ankle. Stand sideways to the anchor. Abduct the working leg outward against the band’s resistance, then slowly return over 3 seconds. The standing abduction pattern places the glute med in its most functionally relevant position — upright, weight-bearing — progressing from the floor-based clamshell position as hip control improves.
✓ Key Cues
- Keep the pelvis level — don’t hitch the hip upward to assist the movement
- Slight forward lean (5–10°) increases glute med activation compared to standing fully upright
- Touch a wall for balance if needed — balance challenge should not limit exercise quality in rehab
EX 14
Hip Extension — Standing Band
Glute Max · Hip Flexor Length · Post-THR
Light Loop Band
Beginner
3Sets
15/sideReps
2s holdAt end range
Anchor band low at ankle height in front of you. Loop around one ankle. Face the anchor, hold a wall for stability. Drive the working leg backward into hip extension against the band’s resistance, hold 2 seconds at end range. The most basic and safest glute max loading exercise — appropriate from the early rehabilitation phase post-hip surgery or in hip flexor tightness presentations where aggressive loaded extension is contraindicated.
✓ Key Cues
- Extend the hip (drive the leg back), not the lumbar spine — avoid arching the lower back
- Slight forward lean into the wall increases the range of hip extension available
- Squeeze the glute hard at full extension — the band is heaviest here, providing maximum cue to contract
EX 15
Glute Bridge — Banded (Fabric)
Glute Max · Glute Med · Lower Back
Fabric Mini Band
Beginner
3Sets
20Reps
2s holdAt top
Lie on your back, fabric band above the knees, feet flat. Drive hips up to full extension while pushing knees outward against the band. The combined hip extension (glute max) and abduction against the band (glute med) makes this one of the most efficient rehabilitation exercises available — it simultaneously addresses the two most common glute deficits in lower limb pathology with a single movement. Safe for lower back, hip, and knee rehabilitation from the earliest phases.
✓ Key Cues
- Actively push the knees apart throughout — don’t just prevent them from caving, actively drive them out
- Full hip extension at the top — don’t stop short; the glute max contracts most at full extension
- Progress to single-leg bridge once 3×20 bilateral is easy and pain-free
EX 16
Hip Flexion — Standing Band
Hip Flexor Rehab · Post-THR · Psoas
Extra-Light Loop Band
Acute Phase
3Sets
15/sideReps
3sEccentric
Anchor band low behind you, loop around one ankle. Face away from the anchor. Raise the knee forward to 90° hip flexion against the band’s resistance, then lower slowly over 3 seconds. The hip flexor complex (iliopsoas, rectus femoris) is a common site of post-surgical weakness and tendinopathy — this exercise provides early-phase graduated loading that free weights cannot safely replicate due to limb weight exceeding tolerable load in acute presentations.
✓ Key Cues
- 3-second eccentric lowering is the primary loading stimulus — resist the band as the leg returns down
- Hold a wall for balance — don’t let balance limit the quality of hip control
- Keep the pelvis level and avoid leaning back — use the core to stabilise against the band’s pull
Ankle & Lower Leg Exercises
Ankle rehabilitation with bands focuses on two distinct goals: strengthening the peroneal muscles and ankle dorsiflexors (weakened following sprains and immobilisation) and restoring proprioception and neuromuscular control (disrupted by ligament damage and swelling). Bands allow ankle loading in all four planes of movement — dorsiflexion, plantarflexion, inversion, and eversion — making them uniquely suited to comprehensive ankle rehabilitation that free weights cannot provide.
Ankle & Lower Leg Exercises (4 Total)
EX 17
Resisted Ankle Eversion — Band
Lateral Ankle Sprain · Peroneal Rehab
Extra-Light Loop Band
Acute Phase
3Sets
15–20Reps
2-1-3Tempo
3×/dayFrequency
Sit on a chair or floor, band looped around the foot, anchored to a fixed point on the inside of the working leg. Evert the foot outward against the band’s resistance (turn the sole outward), hold 1 second, return slowly over 3 seconds. Eversion strengthens the peroneus longus and brevis — the primary lateral ankle stabilisers whose injury defines the lateral ankle sprain mechanism. These muscles are the first priority in ankle sprain rehabilitation and the most commonly neglected in self-directed programmes.
How to Perform
- Sit with the leg extended. Anchor band to a fixed point medial (inside) of the foot, loop around the foot
- Starting position: foot in neutral. Move only the ankle — don’t rotate the leg
- Turn the sole outward (eversion) over 2 seconds, moving only from the ankle joint
- Hold 1 second at end range; return over 3 seconds — resist the band’s pull back
✓ Key Cues
- Movement is at the ankle only — the knee and hip should remain still throughout
- Use extra-light resistance — the peroneals are typically very weak after a sprain; too much resistance forces compensatory movements
- 3-second eccentric return is the remodelling stimulus for peroneal tendon tissue — don’t skip it
↑ Progression
Weeks 1–2: Extra-light band, seated, 3×15 three times daily. Week 3+: Progress to standing on one leg while performing eversion (adds proprioceptive challenge). Progress band resistance weekly once 3×20 at current resistance is pain-free and well controlled.
EX 18
Resisted Dorsiflexion — Band
Ankle Sprain · Shin Splints · Ankle Mobility
Extra-Light Loop Band
Acute Phase
Sit with leg extended, band looped around the foot and anchored in front of the toes. Pull the foot upward toward the shin (dorsiflexion) against the band’s resistance, hold, then slowly lower. Strengthens the anterior tibialis — the dorsiflexor that is weak in shin splints and inhibited after lateral ankle sprains due to pain avoidance of the dorsiflexion range. Also used to restore the dorsiflexion range required for normal walking gait post-sprain.
✓ Key Cues
- Full range: pull the foot as far toward the shin as possible — this is the therapeutic range
- Slow eccentric return — the anterior tibialis is an eccentric muscle during normal gait; train it accordingly
EX 19
Resisted Plantarflexion — Band
Achilles Tendinopathy · Calf Strength
Light Loop Band
Acute Phase
Sit with leg extended, band looped around the ball of the foot, anchored above the toes (hold in both hands or anchor overhead). Push the foot downward (plantarflexion) against the band, hold at end range, return slowly. The seated plantarflexion position targets the soleus (knee bent) specifically — the deeper calf muscle responsible for much of the Achilles tendon load at walking speeds. A gentler alternative to weight-bearing heel raises in the acute phase of Achilles tendinopathy.
✓ Key Cues
- Full plantarflexion range — point the foot as far as possible on every rep
- Bend the knee slightly during the exercise to emphasise soleus over gastrocnemius
- 3-second eccentric return loads the Achilles-calf complex eccentrically — the primary remodelling stimulus for Achilles tendinopathy
EX 20
Single-Leg Balance — Perturbed (Band)
Ankle Proprioception · Post-Sprain
Extra-Light Loop Band
Intermediate
3Sets
30s/sideHold
Eyes closedProgression
Anchor band at ankle height. Loop around the working ankle while standing on that leg. A partner or your own hand creates gentle perturbations in different directions — forward, backward, lateral — while you maintain single-leg balance. This proprioceptive training exercise restores the neuromuscular ankle stability that ligament damage disrupts. Without proprioceptive rehabilitation, re-sprain rates after ankle injury exceed 70% — this exercise addresses the cause rather than just the symptom.
✓ Key Cues
- The perturbations (gentle pushes or pulls via the band) should challenge balance without causing falls — begin with light, slow perturbations
- Progress to eyes closed: removing vision dramatically increases proprioceptive demand
- Progress to unstable surfaces (foam pad) once eyes-closed balance is consistent
Lower Back & Core Stability Exercises
Lower back rehabilitation with bands focuses on anti-movement core control — not spinal flexion (crunches) or extension (back raises), but the spine’s primary functional role: resisting unwanted movement while the limbs load dynamically. The research supporting spinal flexion exercises in lower back rehabilitation is weak; the research supporting motor control, proprioception, and progressive loading through the hip and posterior chain is robust. These exercises reflect that evidence.
Lower Back & Core Exercises (5 Total)
EX 21
Pallof Press — Anti-Rotation
Lower Back · Core Stability · Disc Pathology
Extra-Light to Light Loop Band
Beginner
3Sets
10/sideReps
2–3s holdAt ext.
3×/wkFrequency
Anchor band at chest height to the side. Stand perpendicular to the anchor, hold band at chest with both hands, feet shoulder-width apart. Press both hands straight out in front and hold while resisting the band’s rotational pull. The Pallof press is the cornerstone exercise of evidence-based lower back rehabilitation — it trains the spine in its most important functional role (resisting rotation under limb load) without any flexion or extension stresses that aggravate disc and facet pathology.
How to Perform
- Anchor band at chest height; stand sideways, band held at sternum with both hands
- Core braced: brace as if about to be punched — maintain this throughout
- Press both hands forward to arm’s length — resist the band’s pull toward the anchor with your core, not your arms
- Hold 2–3 seconds, then slowly return to chest. Neutral spine throughout.
✓ Key Cues
- The difficulty of this exercise is felt in the core, not the arms — if the arms are burning, the resistance is too high
- Neutral spine throughout — no rotation, no lateral lean toward the anchor, no flexion or extension
- Move further from the anchor to increase load; closer to decrease. Progress by increasing distance, not resistance.
↑ Progression
Standard standing → staggered stance → half-kneeling → progress to slow-tempo woodchop (EX 22) once 3×10 each side with 3-second holds is comfortable and pain-free. Kneeling progressions are harder than standing because the base of support is reduced.
EX 22
Half-Kneeling Woodchop — Band
Lower Back · Core Stability
Extra-Light Loop Band
Intermediate
3Sets
10/sideReps
SlowTempo
In a half-kneeling position (one knee on the floor, one foot forward), anchor band high. Pull the band diagonally from high to low across the body in a slow, controlled arc. The half-kneeling position removes the hip and leg compensations present in standing, forcing the lumbar spine and hip stabilisers to work independently. This position is used extensively in spinal rehabilitation because it creates controlled rotational demand without the lumbar loading that aggravates disc pathology.
✓ Key Cues
- The torso should remain upright throughout — if it leans, the resistance is too high or hip stability is insufficient
- The rotation occurs through the thoracic spine, not the lumbar spine — think of the ribs turning, not the lower back
EX 23
Bird Dog — Banded
Lower Back · Segmental Control
Extra-Light Loop Band
Beginner
3Sets
10/sideReps
3s holdAt ext.
On hands and knees, extra-light band looped around one foot. Simultaneously extend the banded leg back while extending the opposite arm forward. The band’s resistance increases the hip extension load while demanding greater core stabilisation against the asymmetric force — a clinically validated progression of the standard bird dog exercise. Used extensively in motor control rehabilitation for lower back pain, including disc herniation and facet pain presentations.
✓ Key Cues
- Hips level throughout — don’t allow the pelvis to rotate toward the extending leg
- 3-second hold at full extension: hold the position, then return under control
- The band should be on the lightest setting — the challenge is control and stability, not load
EX 24
Resisted Hip Hinge — Band Pull-Through
Lower Back · Posterior Chain · Disc
Light–Medium Loop Band
Intermediate
Anchor band low behind you, straddle it, grip between the legs. Hinge forward at the hips with a flat back, then drive back to full hip extension via glute contraction. The pull-through is the preferred posterior chain loading exercise for lower back rehabilitation because the band applies force horizontally, creating a hip hinge demand without axial spinal compression — making it far safer for disc and facet pathology than deadlifts or good mornings in early and mid rehabilitation stages.
✓ Key Cues
- Flat back throughout — any lumbar rounding under band tension is a risk in disc pathology
- Think “hips back, not knees bend” — this is a hip hinge, not a squat
- Drive aggressively into hip extension at the top; squeeze glutes hard — this shifts load from the lumbar extensors to the gluteal muscles where it belongs
EX 25
Dead Bug — Resisted (Band)
Lower Back · Motor Control · Disc
Extra-Light Loop Band
Beginner
3Sets
8/sideReps
SlowControlled
Lie on back, band anchored at floor level overhead, hold with both arms extended. From a 90/90 position (hips and knees at 90°), slowly lower the opposite arm and leg simultaneously while resisting the band’s pull on the arm. The band creates an anti-extension challenge that demands greater deep abdominal activation than the standard dead bug. Used in all stages of lower back rehabilitation where lumbar neutral spine control is the therapeutic goal.
✓ Key Cues
- Lower back must remain flat against the floor throughout — if it arches, reduce range of motion, don’t reduce sets
- Exhale as limbs lower; inhale as limbs return — breathing pattern facilitates better abdominal bracing
- Move slowly: 3–4 seconds to lower, 2 seconds to return. Speed is the enemy of motor control in this exercise.
Condition-Specific Rehab Protocols
These protocols combine the exercises above into structured programmes for the four most common presentations seen in physiotherapy using band exercises. Follow each for a minimum of 8–12 weeks.
Protocol A — Rotator Cuff Rehab
✓ 12-Week Minimum · 3–5×/week
1
External Rotation (EX 01)
Every session. Primary cuff remodelling exercise — non-negotiable.
3 × 15
2
Internal Rotation (EX 02)
Every session. Always paired with EX 01.
3 × 15
3
Scaption / Full Can (EX 03)
Every session from week 1. Add weeks 3+ if acute.
3 × 15
4
Band Pull-Apart (EX 05)
Every session. Scapular control — critical throughout all phases.
3 × 20
5
Face Pull (EX 04)
Every session. Can be done daily as a maintenance exercise.
3 × 20
6
PNF Diagonal Patterns (EX 06)
Add from week 4–6 once acute pain is reduced.
3 × 12/side
Protocol B — Lateral Ankle Sprain Rehab
✓ 8–12 Weeks · 3×/day Acute, 2×/day Subacute
1
Resisted Eversion (EX 17)
3× daily in acute phase (weeks 1–2). The peroneal priority.
3 × 20
2
Resisted Dorsiflexion (EX 18)
Alongside EX 17 from week 1. Restores gait dorsiflexion range.
3 × 20
3
Resisted Plantarflexion (EX 19)
Add from week 2. Calf/Achilles loading for full ankle strength.
3 × 20
4
Single-Leg Balance Perturbation (EX 20)
Add from week 3. Proprioception is the key to preventing re-sprain.
3 × 30s
5
Mini-Band Squat (EX 08)
Add from week 4. Returns to functional weight-bearing loading.
3 × 15
Protocol C — Lower Back Pain (Non-Specific)
✓ 3–4× Per Week · Minimum 8 Weeks
1
Dead Bug — Banded (EX 25)
Every session. Foundation motor control exercise.
3 × 8/side
2
Bird Dog — Banded (EX 23)
Every session. Segmental spinal control.
3 × 10/side
3
Pallof Press (EX 21)
Every session. Anti-rotation core — most important loading pattern.
3 × 10/side
4
Glute Bridge — Banded (EX 15)
Every session. Glute activation reduces lumbar extensor overload.
3 × 20
5
Hip Pull-Through (EX 24)
Add from week 3–4. Builds posterior chain without spinal compression.
3 × 15
6
Half-Kneeling Woodchop (EX 22)
Add from week 4–6. Functional rotational loading once pain is managed.
3 × 10/side
Protocol D — Knee PFPS & VMO Weakness
✓ 3–4× Per Week · 8–12 Weeks
1
TKE — Band (EX 07)
Every session, 3× daily in acute phase. Core VMO exercise.
3 × 15–20
2
Clamshell (EX 12)
Every session. Glute med for knee valgus control.
3 × 20/side
3
Mini-Band Squat (EX 08)
From week 2–3 once TKE is pain-free.
3 × 15
4
Side-Stepping (EX 09)
Every session from week 2. Functional glute med loading.
3 × 15/side
5
Step-Up Eccentric (EX 10)
Add from week 4–6. Loaded quad eccentric for patellar tendon health.
3 × 10/side
💡
Track your pain score at the start of every session using a 0–10 scale. Consistent 0–2: progress load or volume. Score of 3–4: maintain current programme. Score 5+: reduce resistance, do not stop training. Consult a physiotherapist if you remain above 4/10 for more than two consecutive weeks without improvement.
Progression Rules for Rehab Band Training
Rehabilitation progression follows different rules from performance training. The primary driver is not strength gain — it is tissue tolerance, which must be earned incrementally. These are the principles that govern safe and effective rehab band progression.
🟢 Phase 1 — Acute (Weeks 1–3)
Isometric & Extra-Light Loading
Goal: pain reduction and neuromuscular re-activation. Extra-light bands only. Isometric holds where pain prevents movement. Frequency over intensity — daily short sessions better than 3× heavy. Pain limit: 3/10 maximum during exercise.
🟡 Phase 2 — Subacute (Weeks 3–8)
Light Loading + Volume
Goal: tissue remodelling and strength rebuilding. Light bands, full range of motion, slow tempo (3s eccentric). Pain limit: 4/10 during, 0/10 the following morning. Introduce bilateral before unilateral. 3–4 sessions per week.
🟠 Phase 3 — Load Phase (Weeks 8–16)
Progressive Resistance
Goal: return to full strength and load tolerance. Light → medium bands. Progress resistance when 3×15 completed with ≤2/10 discomfort. Add unilateral variations. Introduce sport-specific loading patterns.
🔴 Phase 4 — Return to Sport (16+ weeks)
Functional & Power Loading
Goal: match sport-specific loading demands. Medium → heavy bands. Plyometric loading (where appropriate). Full-speed movement patterns. Test movement quality: pain should be 0–1/10 during maximal effort before return-to-sport clearance.
⚠️ Common Rehab Band Mistakes to Avoid
- Progressing resistance before tissue is ready — if pain increases during a session, the band is too heavy, not the exercise is wrong
- Skipping the eccentric phase — the slow return is where the vast majority of tissue remodelling stimulus comes from; rushing it eliminates the therapeutic benefit
- Using performance-weight bands in acute rehab — a medium band that’s appropriate for squats is likely too heavy for rotator cuff ER in week one of rehab
- Stopping at pain relief rather than completing the programme — pain resolution at weeks 3–4 does not mean tissue is healed; full remodelling takes 12–16 weeks minimum
- Training one muscle in isolation — isolated cuff work without scapular control exercises, or TKE without glute med work, produces incomplete outcomes
Recommended Rehab Bands on Amazon
Every protocol in this guide requires a range of band resistances — from extra-light for acute shoulder and ankle work to medium-heavy for load-phase hip and knee exercises. These are the five best-value Amazon picks covering all three band types used across the 25 exercises above.
Frequently Asked Questions
Can I use resistance bands immediately after an injury or surgery?▾
For most soft tissue injuries, yes — with appropriate band weight and range of motion restrictions. Extra-light bands are often used from day one of ankle sprain and shoulder impingement rehabilitation because they allow loading at intensities below pain threshold. Post-surgical rehabilitation timelines vary — rotator cuff repair, ACL reconstruction, and hip replacement all have specific protocols that govern when and how loading can be introduced. Always follow your surgeon’s or physiotherapist’s clearance timeline post-operatively — the exercises in this guide reflect general physiotherapy principles, not individual post-surgical protocols.
How light should the band be for rehab exercises?▾
Much lighter than most athletes expect. The most common error in self-directed band rehabilitation is using a band that’s appropriate for training but too heavy for the targeted muscle in its injured state. For rotator cuff external rotation in week one, an extra-light band (5–8 lbs resistance) is correct. For ankle eversion post-sprain, a thin resistance band that provides barely perceptible resistance is correct. The test: if you cannot complete 15 reps with smooth, controlled technique and pain ≤3/10, the band is too heavy. Start light and progress resistance only when technique and pain criteria are consistently met across multiple sessions.
What’s the difference between rehab band use and training band use?▾
Three key differences: (1)
Resistance — rehab uses much lighter bands; the goal is tissue tolerance and neuromuscular re-activation, not muscle fatigue. (2)
Range of motion — rehab exercises are often performed in restricted ranges determined by pain and healing stage; training exercises use full range from the start. (3)
Frequency — rehab protocols often prescribe daily or twice-daily sessions, while training programmes use 3–5×/week with recovery days. The exercises themselves overlap — face pulls, clamshells, and Pallof press are both rehab and training exercises; the variables that differ are load, range, and frequency. For the full training application, see
Resistance Bands: Full Body Training Anywhere.
Which band type is most commonly used in physiotherapy clinics?▾
Flat latex loop bands and Thera-Band style flat resistance bands are the most universally used in clinical settings. They allow easy resistance modification (simply change the band colour/weight or adjust the starting length), work for upper and lower body exercises, and are inexpensive enough to send home with patients. Fabric mini bands are commonly used for glute and hip exercises. Tube bands with handles see less clinical use because the handles add unnecessary complexity for early-stage patients. For the best-value equivalents of clinical-grade bands available on Amazon, see
Best Resistance Band Systems.
How do I know if an exercise is making my injury worse?▾
Use the 24-hour rule: if pain during exercise is ≤4/10 and returns to baseline within 24 hours of a session, the exercise is appropriate. If pain during exercise exceeds 5/10, or if pain the following morning is worse than before the session, the exercise is too aggressive for the current healing stage. The appropriate response is not to stop training — it is to reduce resistance, reduce range, or switch to a gentler variation (for example, switch from resisted eversion to isometric eversion hold if dynamic eversion causes excessive pain). If pain does not improve within two weeks of appropriate loading, seek individual physiotherapy assessment — the clinical picture may be more complex than general protocol application can address.
Do I need different bands for different body regions?▾
Yes — and the resistance requirements vary dramatically. A band that’s appropriate for hip abduction (medium-heavy, 30–50 lbs) would be dangerously overloaded for rotator cuff external rotation in early rehab (extra-light, 5–10 lbs). The key kit for comprehensive rehab band use: extra-light and light loop bands for shoulder and ankle work; a fabric mini band set for glute and hip exercises; and a light-to-medium loop band for knee and lower back exercises. A full multi-resistance set covering extra-light to heavy provides the range needed for all five body regions in this guide. See the full band set review at
Best Resistance Band Systems.
✓ The Bottom Line
Resistance bands are not a consolation prize for athletes who can’t train normally — they are the primary clinical tool for tissue rehabilitation precisely because their mechanical properties match what healing tissue needs: controllable load, multidirectional application, and ascending resistance that protects vulnerable joint positions. The 25 exercises and four protocols in this guide represent the evidence-based core of what bands can do for rehab. Follow the phase progression, track your pain score every session, and give the tissue the 12+ weeks of consistent loading it needs to remodel fully.
READY TO REHAB?
Find the best rehab-grade band sets on Amazon — reviewed and ranked.
View Best Band Sets →