Battle Ropes: Home Gym Setup & Training Guide (2026)
Battle ropes deliver one of the highest metabolic outputs of any single piece of home gym equipment — conditioning, upper body strength, and core stability in the same session. But getting the setup right matters: the wrong rope length in the wrong space with a bad anchor turns a great tool into a frustrating one. This guide covers everything from rope selection to anchor installation to a complete beginner-to-advanced training programme.
A battle rope is deceptively simple: a thick, heavy rope anchored at its midpoint, with both ends held and moved simultaneously. What makes it unusual as a home gym tool is that it generates an extremely high metabolic demand — heart rate spikes within seconds of starting most battle rope exercises — while being virtually silent, requiring no power supply, and fitting into a footprint smaller than most cardio machines.
The setup decisions you make before your first session will determine whether your rope gets used daily for years or ends up coiled in a corner. Length, thickness, anchor type, and floor surface all interact — getting them right takes about ten minutes of planning and permanently improves every session that follows.
600+Calories per hour — typical burn rate for sustained battle rope HIIT, comparable to rowing and sprint intervals
9–15mTotal floor space needed — the usable length of most home-appropriate battle ropes once folded at the anchor
3×Muscle groups engaged simultaneously — shoulders, core, and legs fire together on virtually every battle rope movement
Why Battle Ropes Work So Well for Home Gyms
⚡ The Core CaseBattle ropes provide cardiovascular conditioning, upper-body muscular endurance, and core stability in a single tool that costs less than a treadmill, makes no noise, and stores flat against a wall. For home gyms where floor space and budget are finite, the efficiency of use-per-square-metre is exceptional. The learning curve is also low — basic movements can be executed safely from session one, with meaningful progression available for years.
✓ Battle Rope Advantages for Home Gyms
No power, no noise. Ropes can be used at any hour without disturbing anyone in adjacent rooms or floors — a genuine advantage over treadmills, bikes, and rowing machines
Infinite scalability. Intensity is controlled by wave speed and rest intervals — the same rope is equally usable by a complete beginner and an advanced athlete
Full-body metabolic stimulus. Wave patterns engage shoulders, arms, core, hips, and legs simultaneously — the closest thing to full-body cardio with a single implement
Compact storage. A 9 m rope coils to roughly 50 cm diameter and hangs on a single wall hook — no footprint when not in use
Durable and low-maintenance. A quality polypropylene or manila rope requires zero maintenance beyond keeping it dry and storing it off the ground
⚠️ Honest Limitations
Space requirement is non-trivial. A 9 m rope folded at the anchor needs 4.5 m of clear space from anchor point to your standing position — tight in small garages or spare rooms
Anchor installation required. A permanent anchor point (wall or floor mount) is the most involved part of setup and needs to be done correctly — improvised anchor solutions are a common failure point
Not a replacement for strength training. Battle ropes build conditioning and muscular endurance, not maximal strength. They complement a strength programme rather than replace it
Floor surface matters. On slippery floors or very hard surfaces, anchoring and footwork can be compromised — rubber matting is strongly recommended
Choosing the Right Rope — Length, Thickness & Material
The three rope variables — length, diameter, and material — determine the weight, wave dynamics, and durability of your setup. Each interacts with your available space and training goals.
Length
Rope length determines working distance. A rope is anchored at its midpoint, so a 9 m rope gives you 4.5 m of working distance from anchor to handles. The longer the rope, the more time a wave takes to travel to the anchor and back — meaning longer ropes are slightly more forgiving on technique at the cost of requiring more space.
← Scroll to see full table →
Rope Length
Working Distance
Best For
Space Needed
9 m (30 ft)
4.5 m from anchor
Home gym standard — best balance of intensity and space
5 m clear minimum
12 m (40 ft)
6 m from anchor
Larger garages; heavier total rope weight; more wave travel time
7 m clear minimum
15 m (50 ft)
7.5 m from anchor
Commercial or serious home gym; very heavy; not beginner-appropriate
9 m clear minimum
6 m (20 ft)
3 m from anchor
Very tight spaces only — reduced wave quality and shorter time under tension
3.5 m clear minimum
Diameter
Thicker ropes are heavier and harder to move — they build shoulder and grip endurance faster but fatigue beginners quickly. Thinner ropes allow faster wave speeds and are better suited to cardio-focused conditioning.
📏 38 mm (1.5 in) — Beginner / Cardio Focus
Lighter overall weight — less shoulder fatigue per set
Faster wave speed — better for high-rep conditioning circuits
Lower grip demand — accessible for users with limited hand strength
Best for: Beginners, cardio conditioning, HIIT circuits, smaller frames
📏 50 mm (2 in) — Intermediate / Strength-Endurance
Noticeably heavier — higher muscular demand per set
Slower maximum wave speed — but higher resistance at any given speed
Higher grip demand — builds hand and forearm endurance alongside shoulder work
Best for: Intermediate to advanced users; strength-conditioning hybrid goals
💡
Home gym recommendation: A 9 m × 38 mm polypropylene rope is the right starting point for the overwhelming majority of home gym users. It fits in a standard one-car garage, costs less than most conditioning alternatives, and provides enough resistance to remain challenging as fitness improves. Upgrade to 50 mm diameter after 6 months when the 38 mm feels manageable across full HIIT sessions.
Material
Polypropylene is the correct choice for home gym use in almost all cases. It’s weather-resistant, doesn’t absorb moisture or odour, maintains flexibility in cold temperatures, and lasts years with basic care. Manila rope looks impressive but degrades quickly outdoors or in humid conditions, sheds fibres, and roughens significantly with use. Nylon is durable but significantly more expensive with minimal performance advantage over polypropylene for typical training use.
Space Requirements & Anchor Options
The anchor is the single most important setup decision — and the most commonly done badly. A bad anchor either fails under load (dangerous), moves during use (reduces effectiveness), or damages your wall or floor (expensive). Here are the options from best to worst for home use.
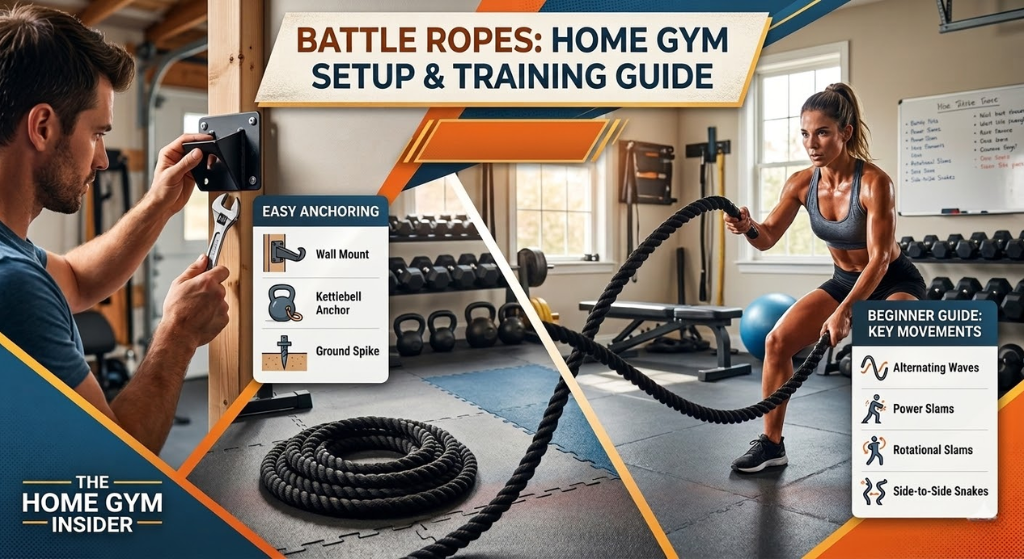
1
Wall-Mounted Anchor Strap — Best Option for Most Home Gyms
A dedicated battle rope anchor plate bolted through a stud into a load-bearing wall is the most secure, permanent solution. The anchor plate must be bolted into a stud — drywall alone will not hold under sustained dynamic loading. Use a stud finder, locate two adjacent studs, and mount the plate with 3-inch structural screws. Height: 30–60 cm from the floor. Most anchor kits include a short looped strap that threads through the plate; the rope loops through this. Total cost: £20–40 for the plate and hardware.
2
Power Rack or Squat Rack Anchor
If your home gym already has a power rack, looping the rope around a vertical upright at the base is a clean, permanent-fixture-free solution. The rack must be bolted to the floor or loaded with significant weight to prevent it moving under rope tension. Wrap the rope’s midpoint around the base of a vertical post at floor height and tie off. This is the preferred solution for home gyms that already have a rack — no installation required.
3
Floor Anchor Plate — Best for Concrete Floors
A floor anchor bolted directly into a concrete slab (with appropriate concrete anchors) is extremely secure and keeps the rope at ground level — a natural position that slightly increases the difficulty of certain movements. Only suitable for concrete or solid stone floors — not for wooden subfloor, suspended floors, or tile over screed. Uses the same anchor strap system as wall mounts.
4
Heavy Dumbbell or Kettlebell Stack — Temporary Option Only
Looping the rope around a stack of heavy dumbbells or a loaded barbell is usable for a first session but not a long-term solution. The anchor shifts under dynamic loading, reducing wave quality and creating a trip hazard. Use this only while a permanent anchor is being installed. Minimum recommended weight: 60 kg stacked as close to the floor as possible.
⚠️
Never anchor to a door handle, radiator, or non-structural wall fitting. Battle rope tension under fast wave movements is higher than most people expect — repeated dynamic loading will pull poorly-anchored fixings out of plaster within weeks. The anchor must be either structural (bolted into stud or concrete) or load-bearing dead weight (60 kg+).
Floor Space Planning
Measure your available space anchor-point to the far wall first. You need:
Working distance: Half the rope length (4.5 m for a 9 m rope)
Buffer behind you: At least 1 m — movement exercises like lateral shuffles require clearance
Width: 2 m minimum — you need room to move laterally and for overhead exercises
Total recommended: 5.5 m × 2 m clear zone for a 9 m rope
Step-by-Step Home Gym Setup
1
Measure and Mark Your Working Zone
Identify the anchor wall and mark a point 4.5 m (for a 9 m rope) into the room. This is your default standing position. Confirm there is at least 1 m of clearance behind this point and 1 m either side. Use tape to mark the zone — this helps with footwork during training and ensures you never accidentally stand too close to the anchor (which dramatically reduces wave effectiveness).
2
Install the Anchor Point
Locate a stud at 30–60 cm height using a stud finder. Mark the stud location, pre-drill pilot holes (slightly smaller than your screw diameter to avoid splitting), and mount the anchor plate with 3-inch structural screws into both studs where possible. Test the anchor before your first session by attaching the rope and pulling with your full body weight for 10 seconds. Any movement or creaking means the anchor needs reinforcing.
3
Lay Rubber Matting
Rubber gym flooring (20 mm thickness minimum) in your working zone serves three purposes: grip for your feet during lateral movements, protection for the rope where it contacts the floor near the anchor, and impact absorption. Interlocking rubber tiles are easier to fit than roll-out mats in irregular spaces. Cover the full working zone — a 2 m × 5 m area is sufficient for most setups.
4
Thread and Secure the Rope
Find the rope’s midpoint (usually marked by the manufacturer). Loop the midpoint through the anchor strap so both halves hang equally. Shake both ends to confirm even length — uneven halves create asymmetric wave resistance. Wrap the handles with electrical tape or heat-shrink wrap if the ends are raw rope — this prevents fraying and provides a more comfortable grip surface.
5
Set Your Starting Position and Test Waves
Stand at your marked position, hold both ends with a neutral wrist grip, slight knee bend, hip-width stance. Create a slow alternating wave: one hand moves up as the other moves down, in a fluid alternating pattern. You should see a clean wave travel from your hands to the anchor point. If the rope piles up near the anchor, you’re standing too close — step back until the wave travels cleanly the full length.
Core Battle Rope Movements
Eight movements cover the full range of what battle ropes can do — from pure conditioning to shoulder strength to lateral power. Learn these in order; the first four are the foundation for all programming.
〰️
Alternating Waves
The foundational movement. One hand rises as the other falls — fluid, continuous alternating pattern. Drives heart rate fast and trains shoulder endurance, core anti-rotation, and hip stability simultaneously.
🌊
Double Waves (Power Slam)
Both hands move together — up simultaneously then slam down, generating large waves. Higher power output than alternating waves, greater demand on shoulder extensors and upper back.
🔄
Circles (Outside/Inside)
Both hands make outward or inward circles simultaneously. Targets the rotator cuff, shoulder stabilisers, and forearm flexors through a different movement plane than wave patterns.
↔️
Side-to-Side Waves
Both hands move laterally in the same direction simultaneously, then back — creating horizontal snake waves. Trains the frontal plane and obliques directly.
🦵
Alternating Waves + Squat
Standard alternating waves performed simultaneously with a continuous squat. The lower body contribution raises metabolic cost significantly — one of the highest-calorie-burn movements in the toolkit.
🔀
Lateral Shuffle + Waves
Alternating waves maintained while shuffling side to side. Adds lateral footwork, hip abductor demand, and coordination. Requires more working width; confirm 2 m side clearance before attempting.
💥
Slams
Both ends raised overhead simultaneously then slammed to the floor with maximum force. Maximum power output movement. Short work intervals (8–12 sec) with longer rest for power development.
🌪️
Alternating Waves + Lunge
Waves maintained while alternating forward lunges. The most technically demanding foundational movement. Build this in after alternating waves and squat-waves are comfortable.
Training Programming — Beginner to Advanced
Battle rope training works on a simple principle: work-to-rest ratio determines training outcome. High intensity with short rest (1:2 or 1:1 ratio) drives cardiovascular adaptation; longer work intervals with movement variation develop muscular endurance; short explosive intervals with full rest develop power.
Beginner Programme — Weeks 1–4
Focus: building work capacity, learning movement quality, establishing the aerobic base. Three sessions per week with at least one rest day between each.
← Scroll to see full table →
Exercise
Work
Rest
Rounds
Goal
Alternating Waves
20 sec
40 sec
4
Clean wave form throughout
Double Waves
15 sec
45 sec
3
Maintain power; don’t slow to a crawl
Circles (out)
15 sec each direction
30 sec
2
Shoulder stability; not speed
Alternating + Squat
20 sec
60 sec
3
Maintain wave quality while squatting
Total session time
~18–22 minutes
Accessible, full-body
Intermediate Programme — Weeks 5–10
Focus: increasing work density, adding movement complexity, building lactate tolerance. Four sessions per week.
📐 Programming PrincipleThe biggest mistake in battle rope programming is making every session a maximum-intensity cardio blowout. Vary your training stimuli: 2 sessions per week at high intensity (1:1 work-to-rest or less), 1–2 sessions at moderate intensity with longer work intervals for muscular endurance, and 1 session per week with pure power focus (short slams, full rest).
Common Setup & Training Mistakes
⚠️ Mistakes That Kill Results or Cause Injury
Standing too close to the anchor. The single most common beginner error. When you stand too close, the rope pools near the anchor instead of forming clean waves — the exercise becomes dramatically easier and less effective. Step back until the rope is taut (not slack) at the start of each rep.
Using the arms only. The power for large waves comes from the hips — a small hip drive with each wave amplifies arm movement and massively increases both effectiveness and longevity within a set.
Letting the wrists collapse inward. A neutral wrist position (thumb-up, like a handshake) maintains the correct force transmission line. Wrists collapsing into ulnar deviation creates impingement risk at the wrist and elbow with repeated use.
Skipping the anchor quality check. An anchor that moves slightly during use disrupts wave mechanics and can fail under repeated loading. Check your anchor every 4–6 weeks by pulling hard in multiple directions.
No rope protection at the anchor point. Where the rope contacts the anchor or the floor near the anchor, friction causes wear over time. Wrap the anchor contact point with rubber hose or thick tape, and place a rubber mat at the base of the anchor wall.
Storing the rope in sunlight or outdoors. UV degradation accelerates in polypropylene — a rope stored where direct sunlight hits it regularly will become brittle and eventually fail.
Frequently Asked Questions
Yes, with a 6 m rope. A 6 m rope folded at the anchor gives you 3 m of working distance — enough to generate clean waves in a 4 m space with 1 m behind you. The trade-off is a lighter, faster rope with less total resistance than a 9 m option. Alternatively, if your garage has a side wall you can anchor to, that may give you more working depth in a different orientation.
Different stimulus profiles with significant overlap. Rowing machines provide lower-body drive (legs generate ~60% of power) with sustained, even-paced aerobic output. Battle ropes are upper-body dominant, generate higher heart rate spikes in shorter intervals, and provide greater movement variety. Calorie burn at maximum effort is comparable — both can reach 600+ kcal/hr. Battle ropes win on storage footprint and silence; rowing machines win on steady-state aerobic development and lower body involvement.
Only if the rack is very heavy and stable. An unbolted, unloaded squat rack will slide under repeated battle rope tension. If your rack has been loaded with 100+ kg of plates and has rubber feet, it may be stable enough. Test by attaching the rope and pulling hard laterally — if the rack shifts even 5 cm, bolt it down or use a wall anchor instead.
3–4 sessions per week is optimal for most users. Battle ropes generate significant shoulder and forearm fatigue — the same muscle groups used in pressing, pulling, and overhead work. If you’re also lifting 4–5 days per week, 2–3 rope sessions is more sustainable. The key recovery marker: if your shoulder external rotation strength feels reduced going into a strength session, reduce frequency to 2× per week.
Primarily conditioning, with meaningful muscular endurance and hypertrophy in the shoulders and forearms. Consistent heavy rope work does produce visible shoulder and arm development — particularly in the posterior deltoids, lateral deltoids, and forearm flexors. For maximum muscle building, use battle ropes as conditioning work alongside a structured strength programme.
Manila is traditional; polypropylene is practical for home use. Manila rope absorbs moisture and odour, degrades faster in humid or outdoor environments, sheds fibres over time, and stiffens in cold temperatures. Polypropylene rope is weatherproof, maintains consistent flexibility in all temperatures, and typically lasts longer with less care. Unless you specifically want natural fibre, polypropylene is the correct choice for a home gym setup.
Yes — battle ropes are one of the more calorie-efficient conditioning tools available per unit of time. A 20-minute high-intensity session burns approximately 200–300 kcal for an average-weight person, with the EPOC effect extending the calorie burn for several hours post-session. The critical variable, as with all conditioning tools, is diet — battle ropes accelerate calorie expenditure but don’t override a surplus.
Set It Up Right Once — Train It for Years
The setup decisions covered in this guide — rope length, anchor type, floor surface, working distance — each individually make a difference. Together, they determine whether battle ropes become one of the most-used pieces of equipment in your home gym or an underutilised purchase collecting dust in a corner.
Take the 30 minutes to install a proper anchor, buy the right rope length for your space, and lay down rubber matting. After that, the programming takes care of itself: start with alternating waves, progress the work intervals, add complexity as the basic movements become automatic.