Fitness & Equipment
Build Your Dream Home Gym: The Complete 2026 Setup Guide for Every Budget
Whether you’re tired of expensive gym memberships, hate waiting for equipment, or simply want to train on your own schedule, building a home gym is one of the smartest fitness investments you can make. This guide covers everything — from choosing the right flooring and picking your first barbell to scaling up with advanced recovery tools — so you can create a setup that actually works for your space, budget, and goals.
1. Why Build a Home Gym in 2026?
The home gym revolution didn’t start with the pandemic, but the events of 2020 certainly accelerated it. Since then, the quality and affordability of home gym equipment has improved dramatically. What used to require a large budget and significant space can now be achieved in a spare bedroom, a converted garage, or even a section of a living room.
Let’s get honest about why people make the switch — and whether it makes sense for you.
The Real Cost of a Commercial Gym Membership
The average gym membership in the United States costs between $40 and $80 per month. Over five years, that’s $2,400 to $4,800 — before you factor in gas, time, parking, or the occasional month where you pay for a gym you barely visit. Many quality home gym setups can be built for less than two years of gym fees, and they appreciate in value (or at least hold their resale value) far better than most fitness subscriptions.
The Convenience Factor Is Underrated
Most people overestimate how motivated they’ll feel driving to a gym after a long workday. When your gym is twenty steps from your kitchen, the barrier to entry disappears. You can squeeze in a 25-minute session before the kids wake up, train barefoot, blast whatever music you want at full volume, and never wait for a squat rack again. That kind of friction-free access dramatically increases long-term consistency — and consistency is what actually produces results.
✔ Pros of a Home Gym
- No monthly fees after initial investment
- Available 24/7, zero commute
- No waiting for equipment
- Train exactly how you want
- Completely hygienic — your sweat only
- Equipment holds resale value
- Great for families — everyone benefits
✗ Cons of a Home Gym
- Upfront cost can be significant
- Requires dedicated space
- No social training environment
- You’re your own equipment manager
- Limited variety vs large commercial gyms
- Requires self-discipline
Who Is a Home Gym Best For?
Home gyms work exceptionally well for people who train 4–6 days per week with a consistent program. If you’re a powerlifter, a strength-focused lifter, a calisthenics enthusiast, or someone following a structured program like 5/3/1 or Starting Strength, a home gym will serve you better than most commercial gyms. It’s also ideal for parents of young children, remote workers, early risers, and anyone in a rural area with limited gym access.
If you thrive on social energy, enjoy group fitness classes, or need the accountability of a specific gym culture, you may want to supplement your home setup with occasional commercial gym visits — and that’s perfectly fine too.
2. Planning Your Space: What You Actually Need
Before you order a single piece of equipment, spend thirty minutes honestly assessing your available space. This single step prevents some of the most common and costly home gym mistakes.
Minimum Space Requirements by Setup Type
| Setup Type | Minimum Footprint | Ideal Ceiling Height | Best Location |
|---|---|---|---|
| Bodyweight / Resistance Band Only | 6 × 8 ft (48 sq ft) | 8 ft | Bedroom, living room |
| Dumbbell + Bench Setup | 8 × 10 ft (80 sq ft) | 8 ft | Spare room, basement |
| Barbell + Squat Rack | 10 × 10 ft (100 sq ft) | 9–10 ft | Garage, basement |
| Full Power Station (rack + cardio) | 12 × 14 ft (168 sq ft) | 10+ ft | Garage, dedicated room |
| Full Home Gym (all-in-one) | 15 × 20 ft (300 sq ft) | 10+ ft | Two-car garage, large basement |
Don’t Forget the Overhead Space
Ceiling height is the most overlooked factor in home gym planning. If you want to do overhead press, snatches, or even heavy barbell squats, you need clearance above the bar. A standard 7-foot barbell loaded with 45-pound plates stands about 7 feet tall when overhead pressed by a 5’10” person. Add some safety margin and a minimum of 9 feet becomes your target. Always measure before buying a rack.
Climate and Ventilation
Garages can get brutally hot in summer and freezing in winter. If you live in a climate with temperature extremes, budget for a small portable air conditioner, a space heater, or at minimum a strong fan. Cast iron and steel equipment handles temperature swings fine, but you will sweat through your workouts faster in a hot space — which means ventilation directly affects training quality. A dehumidifier also helps prevent rust on bare steel.
Lighting and Motivation
Dark, dingy spaces kill motivation. If your basement or garage lacks good natural light, invest $50–$100 in LED shop lights before buying any fitness equipment. Bright, well-lit spaces make training feel better, help you check your form in mirrors, and simply make the whole experience more enjoyable. A few motivational posters, a dedicated Bluetooth speaker, and your favorite playlist do more for gym attendance than any supplement.
3. Flooring: The Foundation of Every Great Home Gym
Flooring is the unsexy purchase that experienced home gym owners will tell you to prioritize. Dropping a barbell on bare concrete — even once — is enough to crack the floor, damage the bar, and wake your neighbors. Good flooring protects your equipment, your joints, your floor, and your relationships.
Types of Home Gym Flooring
Rubber Stall Mats (Budget Champion)
4×6 foot rubber stall mats, originally designed for horse stalls, have become the go-to flooring for budget home gyms. At $40–$60 per mat, they’re affordable, durable, and come in at about 3/4-inch thickness — enough to handle dropped dumbbells and moderate barbell work. The main downsides are that they’re heavy (100+ lbs each), emit a strong rubber smell for the first few weeks, and require some trimming for odd-shaped spaces.
Interlocking Rubber Tiles
Pre-cut interlocking tiles in 2×2 or 3×3 foot sections offer more flexibility in layout. They’re easier to install, handle, and replace if damaged. Quality matters enormously here — cheap foam-rubber hybrids compress too easily under heavy equipment. Look for tiles that are at least 3/4-inch thick and made from vulcanized rubber. Brands like Rogue, Titan, and American Floor Mats are well-regarded.
Deadlift Platform
If you lift heavy, consider building or buying a dedicated deadlift platform — a raised surface made from plywood topped with rubber that absorbs the impact of dropped weight. This can be combined with stall mat flooring, and it also defines your “heavy lifting zone” within the gym, which is psychologically useful for focus.
Flooring Thickness Guide
4. Budget Tiers: How Much Does a Home Gym Actually Cost?
One of the biggest myths about home gyms is that you need to spend $5,000+ to get a decent setup. The truth is you can build an effective training environment at nearly every price point — as long as you’re strategic about what you buy first.
| Tier | Budget Range | Core Equipment | Best For | Rating |
|---|---|---|---|---|
| Starter | $300–$700 | Resistance bands, pull-up bar, adjustable dumbbells, yoga mat | Beginners, small spaces, renters | Best Value |
| Intermediate | $700–$2,000 | Barbell, plates, adjustable bench, squat stands + flooring | Strength-focused lifters, garage owners | Most Popular |
| Serious | $2,000–$5,000 | Full power rack, calibrated plates, cable attachments, cardio machine | Intermediate to advanced lifters | High Value |
| Premium | $5,000–$15,000 | Commercial-grade rack, bumper plates, GHD, assault bike, recovery tools | Competitive athletes, serious enthusiasts | Premium |
How to Stretch Your Budget
The used market for gym equipment is enormous and underutilized. Facebook Marketplace, Craigslist, and local gym liquidation sales regularly feature high-quality equipment at 30–60% below retail. Bumper plates, dumbbells, and even power racks from reputable brands appear regularly. The trick is knowing what to buy used versus new: barbells, racks, and flooring are safe used purchases. Electronics (heart rate monitors, treadmill consoles), anything with foam padding (bench seats), and cable pulleys are better bought new.
For a comprehensive review of the best all-in-one home gym systems across budget tiers, check out FitCore360’s roundup of the best all-in-one home gyms, which covers everything from compact cable machines to full functional trainer systems.
5. Must-Have Equipment for Any Home Gym
Regardless of your budget, certain pieces of equipment provide the foundation for almost every effective training program. If you’re starting from scratch, prioritize these before anything else.
Olympic Barbell
The single most versatile piece of equipment. A quality 20kg/45lb bar opens the door to squats, deadlifts, bench, overhead press, rows, and more. Look for a tensile strength of at least 150,000 PSI.
Weight Plates
Standard rubber-coated cast iron plates are durable and affordable. Bumper plates are essential for Olympic lifting. Start with 2× each of 45, 25, 10, 5, and 2.5 lbs for versatility.
Adjustable Bench
A flat/incline/decline bench multiplies the utility of dumbbells and a barbell. Look for a bench that’s rated to at least 700 lbs, has a stable base, and adjusts without wobble at each angle.
Power Rack or Squat Stands
Safety is non-negotiable when training alone. A power rack with safeties allows you to lift heavy without a spotter. Squat stands are more affordable but offer less protection for max efforts.
Dumbbells
A set of adjustable dumbbells (like Powerblocks or Bowflex SelectTech) saves enormous space. Alternatively, a fixed hex dumbbell set from 10 to 50 lbs covers most training needs.
Resistance Bands
Bands are criminally underrated. They’re great for warm-ups, assistance work, rehabilitation, and standalone training. A set covering light to heavy resistance costs under $50 and lasts years. See our guide on resistance band sets vs singles to find the right system for your needs.
Pull-Up Bar
One of the best pound-for-pound investments in fitness. A doorframe pull-up bar costs $25–$40 and enables dozens of exercises. A wall-mounted or rack-mounted bar is sturdier for heavy loading.
Rubber Flooring
Already covered in Section 3 — but worth reiterating here. Never skip the flooring. It’s the first thing that protects everything else you buy, including your concrete floor and your equipment.
What to Skip (At First)
Resist the temptation to buy specialty equipment before you’ve mastered the basics. Preacher curl benches, leg press machines, Smith machines, and pec deck attachments are all useful — but none of them will move the needle for a beginner or intermediate lifter the way a solid barbell, rack, and bench will. Build a deep library of compound movements first, then add specialty tools as your program demands them.
6. Setting Up Your Strength Training Zone
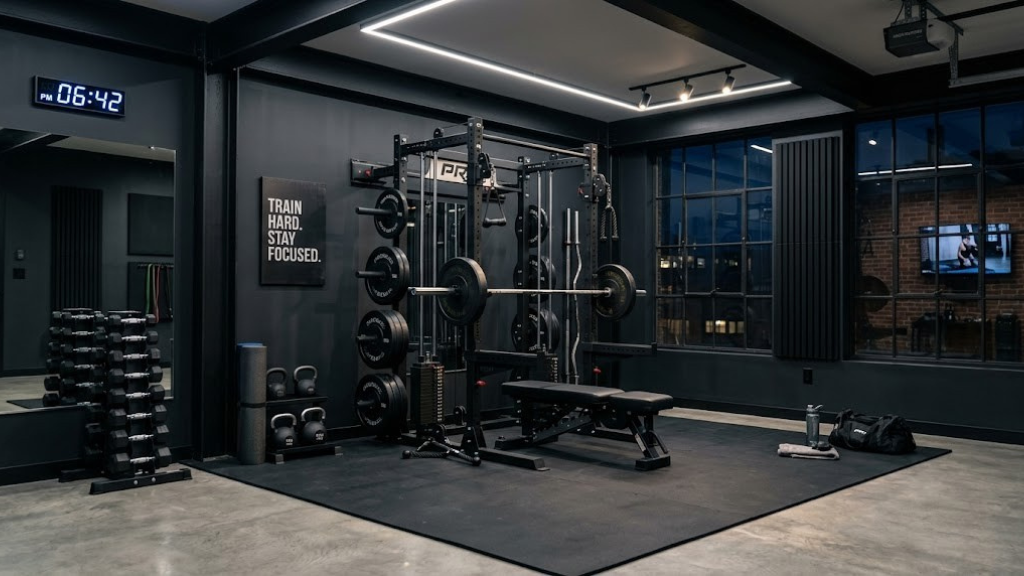
Strength training is the backbone of most home gym setups, and the power rack is the centerpiece. Getting this part right determines how safely and effectively you can train for years to come.
Choosing the Right Power Rack
Power racks come in three main configurations: the full cage (four uprights, maximum safety), the half rack (two uprights, takes less space), and the folding rack (wall-mounted, folds flat when not in use). For most home gym owners, a full cage is the recommended choice. Look for a rack with at least 3×3-inch steel uprights, numbered hole spacing of 1 inch in the bench zone (for precise bar height adjustment), and compatibility with common attachments like lat pulldown systems, landmine posts, and dip handles.
Barbell Selection Guide
Not all barbells are created equal, and the right bar depends on your primary training style:
- Power Bar — Stiffer shaft, aggressive knurling, center knurl. Best for powerlifting (squat, bench, deadlift). Examples: Rogue Ohio Power Bar, Texas Power Bar.
- Multi-Purpose / “All-Rounder” Bar — Moderate flex, dual knurl marks. The best choice for general strength training. Works for every major lift.
- Olympic / Weightlifting Bar — More whip (flex), smooth spinning sleeves, passive center knurl. Best for snatches, clean & jerks, and Olympic lifting.
- Trap/Hex Bar — Excellent for beginners learning the deadlift pattern, reduces spinal load, also doubles as a carry and press tool.
Plate Storage and Organization
A dedicated plate tree or horn storage system keeps your gym organized and prevents plates from becoming a tripping hazard. Many racks include plate horns as standard or optional add-ons. Vertical plate storage (standing on edge) also takes significantly less floor space than horizontal stacking.
Training Accessories That Belong in Every Strength Gym
Building grip strength alongside your lifting is something most people neglect until it becomes the limiting factor in deadlifts and pull-up progressions. For dedicated grip work, explore options ranging from the best grip strength trainers reviewed by FitCore360 to understand what tools actually move the needle.
When it comes to chalk — which massively improves grip during heavy pulls — you’ll want to understand the tradeoffs between liquid chalk versus block chalk. Liquid chalk is cleaner and less likely to irritate housemates or landlords; block chalk delivers maximum friction but can coat your space.
7. Cardio Equipment for the Home Gym
Cardio in a home gym doesn’t mean you need a $3,000 treadmill gathering dust in the corner. The best home gym cardio equipment is usually compact, durable, and versatile — not the mirrored cruise-ship variety found in big box gyms.
Top Cardio Options Compared
| Equipment | Space Needed | Approx. Cost | Intensity Range | Best For |
|---|---|---|---|---|
| Assault/Echo Bike | 3 × 4 ft | $700–$1,200 | Low → Max | HIIT, conditioning |
| Rowing Machine (Concept2) | 4 × 8 ft | $900–$1,100 | Low → Max | Full-body cardio, endurance |
| Ski Erg | 2 × 4 ft (wall-mounted) | $700–$900 | Low → Max | Upper-body conditioning |
| Battle Ropes | 20 ft length | $80–$250 | Moderate → Max | HIIT, upper-body endurance |
| Jump Rope | Minimal | $15–$60 | Moderate → High | Conditioning, warm-up |
| Treadmill (folding) | 3 × 6 ft (folds) | $500–$2,500 | Low → High | Walking, running, rehab |
Battle Ropes: The Underrated Conditioning Tool
Battle ropes deliver an extraordinary cardiovascular challenge while also building serious upper body endurance — specifically in the shoulders, arms, and core. They’re durable, require no electricity, store easily when not in use (simply coil and hang on a hook), and can be used outdoors or indoors. If you have a 20-foot wall or a post to anchor them to, battle ropes deserve serious consideration in any home gym cardio setup. For home-gym specific options, our guide to the best battle ropes for home gyms breaks down rope thickness, length, and anchor options in detail.
The Case for the Assault Bike
If you could only own one cardio machine for a home gym, many coaches and athletes would point to the Assault Bike (or its equivalents from Rogue, Schwinn, or Titan). It’s nearly indestructible, requires no electricity, works upper and lower body simultaneously, and provides a calorie burn per unit of time that rivals almost any other aerobic tool. The maximum intensity is truly limited only by the user — which makes it equally useful for easy recovery rides and soul-crushing HIIT intervals. The only downside is that it’s loud, which matters in apartment settings.
8. Accessories and Add-Ons That Punch Above Their Weight
Some of the most impactful home gym upgrades cost less than $100. These accessories fill in the gaps that major equipment leaves behind, add training variety, and often prevent the boredom that derails long-term home gym success.
Gymnastics Rings
Gymnastics rings are one of the most criminally undervalued pieces of fitness equipment. A quality pair of wooden rings costs $30–$60, supports hundreds of pounds, and can be hung from a pull-up bar or ceiling joist in minutes. They enable ring rows (an excellent beginner pulling movement), ring push-ups, dips, muscle-ups, L-sits, and even inverted work. The instability they introduce recruits far more stabilizer muscles than fixed-surface equivalents.
Parallette Bars
For calisthenics enthusiasts, parallettes are excellent for push-up progressions, L-sits, planche work, and handstand practice. The decision between low and high parallettes affects what movements are practical — and whether you go with wood or steel affects grip feel and durability. If parallettes are on your radar, check out our detailed breakdown of the best parallette bars: wood vs steel to find the right option for your training style.
Dip Bars and Dip Stations
Dips are one of the most effective upper-body pressing movements you can do, and dedicated dip bars allow far more range of motion than typical rack-mounted dip attachments. Freestanding dip stations cost $80–$200 and handle the loading of even strong athletes with weighted dips.
Ab Wheel
At roughly $15–$25, the ab wheel remains one of the most effective core training tools ever made. Ab rollouts build anti-extension core strength — the same quality that protects the spine during heavy squats and deadlifts — better than almost any machine-based alternative.
Foam Rollers and Lacrosse Balls
Self-myofascial release isn’t the cure-all it was once marketed as, but targeted soft tissue work with a high-density foam roller or lacrosse ball genuinely reduces muscle soreness and improves joint range of motion before training sessions. A quality foam roller costs $20–$40 and lasts for years.
Lifting Straps and Chalk
When grip becomes the limiting factor before your target muscle groups are fatigued, lifting straps allow you to keep pulling. This is particularly relevant for heavy deadlifts, heavy rows, and lat pulldowns. If you’re wondering whether straps will hurt your grip development long-term, our article on whether lifting straps hurt your grip long-term gives a nuanced, evidence-based answer to a surprisingly complex question.
9. Recovery and Mobility Tools: The Overlooked Half of Training
Training is the stimulus. Recovery is where the adaptation actually happens. A home gym that includes dedicated recovery tools isn’t a luxury — it’s a sign of training maturity. The best home gym setups dedicate a corner or zone specifically to recovery work.
Slant Boards
Slant boards have surged in popularity thanks to their effectiveness for improving ankle mobility and enabling deep squatting for people with limited dorsiflexion. They’re also used therapeutically for patellar tendon issues (decline squats) and as a general warm-up tool for lower body sessions. Physical therapists actively recommend specific slant board protocols, and there’s solid evidence behind their effectiveness when used correctly.
If you’re considering adding one, understand that adjustable slant boards offer more versatility than fixed-angle models — which affects both exercise variety and the learning curve. Our detailed breakdown of adjustable versus fixed slant boards helps you decide which configuration fits your training better.
Inversion Tables
For home gym users who spend long hours sitting (remote workers, for example) or who experience lower back tension after heavy lifting sessions, inversion tables provide traction-based decompression of the lumbar spine. The evidence for inversion therapy is modest but real for specific populations. That said, inversion tables are not suitable for everyone — people with high blood pressure, glaucoma, herniated discs, or heart conditions should consult a physician first.
Balance Boards
Balance boards improve proprioception (joint position sense), ankle stability, and general athletic movement quality. They’re particularly valuable for surfers, skiers, snowboarders, and team sport athletes — but also for anyone who wants to add a coordination and stability dimension to their training. The difference between a rocker board, wobble board, and roller board affects difficulty level and which adaptations you’ll actually train.
Cold Plunge Tubs
Cold water immersion has gone mainstream, and for good reason — the evidence for its effects on inflammation, mood, and recovery is genuinely compelling when protocols are followed correctly. Setting up a cold plunge at home has become increasingly accessible, with purpose-built tubs ranging from $300 to $5,000+ depending on cooling capability and build quality. For outdoor home gym setups, there are particularly good options designed to handle temperature variation and UV exposure in outdoor environments.
Infrared Saunas
At the opposite end of the thermal spectrum, infrared saunas are becoming an increasingly common addition to serious home gym setups. Unlike traditional steam saunas, infrared models don’t require water, generate lower ambient temperatures (110–150°F vs. 180°F+), and can be installed in much smaller spaces — sometimes even as a one- or two-person unit in a corner of a large room. The physiological effects of regular sauna use — particularly on cardiovascular health and recovery — are among the most robustly documented in exercise science.
10. Programming Your Home Gym Training
Equipment is only as good as the program driving it. One of the most common mistakes home gym beginners make is buying equipment without a coherent plan for how to use it. The best equipment list in the world produces mediocre results if the training program is random.
Choose Your Primary Goal First
Every effective training program begins with a primary goal. Not “get fit” — something specific and measurable, like “add 50 lbs to my deadlift in 12 weeks” or “be able to do 10 strict pull-ups” or “lose 20 lbs while maintaining muscle.” Your goal dictates your program structure, which dictates what equipment you actually need.
Recommended Programs by Goal
| Goal | Program Style | Key Equipment | Sessions/Week |
|---|---|---|---|
| General strength (beginner) | Linear progression (SS, SL 5×5) | Barbell, rack, bench, plates | 3 |
| Muscle building | Upper/lower or push/pull/legs | Barbell, DBs, cables, bench | 4–6 |
| Fat loss / conditioning | HIIT + strength hybrid | Barbell, cardio machine, battle ropes | 4–5 |
| Powerlifting | Block periodization | Power rack, power bar, heavy plates | 3–4 |
| Calisthenics / gymnastics | Skill + volume progression | Pull-up bar, rings, parallettes, dips | 4–5 |
| Athletic performance | Conjugate or block | Full gym + cardio + slant board | 4–6 |
The Value of Tracking Progress
At home, there’s no trainer watching your progress, no gym environment holding you accountable. The solution is systematic tracking. Use a notebook, a spreadsheet, or an app like Strong or Hevy to log every set, rep, and weight. Review your logs weekly. Progressive overload — consistently adding small amounts of stress over time — is the fundamental mechanism behind all physical adaptation, and you cannot manage what you don’t measure.
Warm-Up Protocols for Home Gym Training
Without the natural warmup that comes from walking to a gym, driving, and navigating a large space, home gym training starts cold — literally. Build a deliberate warm-up protocol into every session. A 5-10 minute combination of light cardio (jump rope, bike), mobility work (hip circles, thoracic rotation, ankle mobilization), and warm-up sets at submaximal weights is enough to prepare the body for high-intensity work and dramatically reduces injury risk.
11. Common Home Gym Mistakes (and How to Avoid Them)
Having helped thousands of people navigate their home gym setups, we’ve seen the same mistakes repeated over and over. Here’s how to avoid the most costly ones.
Mistake 1: Buying Everything at Once
The excitement of building a home gym can lead to purchasing a full equipment list before you’ve even trained in the space. This is how people end up with a commercial-grade lat pulldown machine gathering dust because they actually prefer barbell rows. Start with the essentials, train consistently for 60–90 days, and let your actual training experience guide subsequent purchases.
Mistake 2: Skimping on the Barbell
The barbell is the one piece of equipment you will use every single session if you’re strength training. A cheap barbell with a low tensile strength will bend, have rough sleeves that damage your plates, and may even fail under heavy loads. Spend at least $200–$300 on your barbell and treat it as an investment, not a cost.
Mistake 3: Ignoring Noise and Impact
This matters especially if you live in an apartment, a townhome, or have a gym above living space. Deadlifts dropped from waist height create enormous impact. If your gym is above a bedroom or living area, you need at minimum a thick rubber deadlift platform (1.5–2 inches), and ideally a layer of plywood beneath that. Neighbors and housemates will notice, and their goodwill directly affects how freely you can train at unusual hours.
Mistake 4: No Safety Equipment
Training alone without a spotter means you must have backup safety measures. On a rack, set the safeties to the correct height for every exercise. Never max bench press without either a rack with safeties or a spotter. Learn the “roll of shame” for emergencies. Train within yourself on solo sessions and save true max efforts for when someone is available to spot.
Mistake 5: Forgetting About Lighting and Atmosphere
A dark, cluttered, cold gym breeds avoidance. Your environment shapes your behavior far more than most people acknowledge. Invest in lighting, keep the space clean and organized, add a mirror for form checks, and make the gym a place you genuinely want to spend time. These psychological factors compound dramatically over months and years.
Mistake 6: Underestimating Equipment Weight
A power rack can weigh 300–500 lbs. A full set of bumper plates for Olympic lifting totals hundreds more. If your gym is on an upper floor, confirm the load-bearing capacity of the floor structure with a contractor before moving heavy equipment in. Most residential floors are rated for 40–50 lbs per square foot — which can be exceeded quickly with concentrated equipment loads.
- Measure ceiling height before buying any tall equipment
- Confirm floor load capacity for upper-level gyms
- Install flooring before any equipment arrives
- Plan the equipment layout on paper before purchase
- Check ventilation and temperature control options
- Set rack safety pins to the correct height before every session
- Keep a training log from day one
12. Your Home Gym Upgrade Path: Growing Over Time
The best home gyms aren’t built in a day — they’re built over months and years as your needs evolve and your budget allows. Having a clear upgrade path prevents impulse purchases and ensures each addition genuinely serves your training.
Phase 1: Foundation (Month 1–3)
Focus exclusively on the big three — barbell, rack, bench — plus flooring. Learn the fundamental movement patterns: squat, hinge (deadlift), push (bench and overhead press), and pull (barbell row). Resist adding anything else until these are mastered and you’re training consistently.
Phase 2: Expansion (Month 3–12)
Add dumbbells or an adjustable dumbbell set for isolation and accessory work. A pull-up bar if not already on the rack. Resistance bands for warm-up and assistance movements. A basic cardio tool — jump rope at minimum, battle ropes or an assault bike if budget allows. Consider adding chalk and lifting accessories as your working loads increase.
Phase 3: Specialization (Month 12+)
This is where the home gym becomes truly personal. Add equipment that aligns with your specific goals and gaps. Calisthenics-focused athletes add rings, parallettes, and a hangboard. Competitive lifters add calibrated plates, a belt squat machine, or specialty bars (cambered bar, SSB, Swiss bar). Athletes focused on conditioning add a ski erg, rowing machine, or sled. Recovery-focused additions — slant boards, inversion tables, cold plunge setups — typically arrive at this stage too.
Phase 4: Premium Additions (Year 2+)
Few home gym owners reach this stage without being deeply serious about their training — and that’s fine. Phase 4 additions include commercial-grade cable systems (which enable dozens of exercises otherwise impossible at home), GHD machines for posterior chain development, specialized recovery technology like infrared saunas or purpose-built cold plunge tubs, and sport-specific equipment for competition preparation.
Selling and Trading Gear You’ve Outgrown
The used gym equipment market is robust. Pieces you no longer use — entry-level racks, starter dumbbells, basic benches — can often be sold at 60–75% of purchase price. Treat your home gym equipment as depreciating assets you’ll periodically upgrade, not permanent fixtures. This mentality makes it much easier to invest in higher-quality pieces over time because you know the previous generation has resale value.
Frequently Asked Questions About Home Gyms
How much space do I realistically need for a home gym?
The minimum functional space for a barbell-based home gym is approximately 10×10 feet (100 square feet), with a ceiling height of at least 9 feet for overhead pressing. A more comfortable setup with room to move around equipment comfortably sits around 12×14 feet. For bodyweight and resistance band training only, you can work effectively in as little as 6×8 feet. Measure your available space carefully before purchasing any large equipment, and always account for ceiling clearance — especially for overhead barbell movements.
What’s the minimum budget for a functional home gym?
A genuinely functional beginner home gym can be assembled for $300–$600. This typically includes: a set of resistance bands ($30–$50), a doorframe pull-up bar ($25–$40), a pair of adjustable dumbbells or a fixed set up to 50 lbs ($150–$250), a yoga mat ($20–$40), and potentially a jump rope ($15–$30). This setup supports bodyweight training, basic strength work, and cardiovascular conditioning. If you want to add a barbell and a basic power rack, expect to spend $800–$1,500 for quality used or budget new equipment.
Can I build a home gym in an apartment?
Yes, but with important caveats. Barbell training in an apartment is often impractical due to floor load concerns, noise from dropped weights, and space limitations. The best apartment gym options include: adjustable dumbbells and a bench, resistance bands, a pull-up bar mounted in a doorframe, gymnastics rings, and a compact cardio tool like a jump rope or foldable bike. Floor load ratings in most apartments support these lighter setups easily. Always check with your building management before installing any wall- or ceiling-mounted equipment.
Is a home gym actually worth it financially?
For most consistent gym-goers, yes — significantly so. At an average gym membership cost of $55/month, a $1,000 home gym investment breaks even in roughly 18 months. After that, every workout is essentially free. The break-even point improves further when you factor in gas, time savings, and the resale value of quality equipment. The financial case is strongest for people who train 4+ days per week; for once-a-week gym-goers, the math is less compelling.
What flooring should I use under a power rack?
For a power rack, use rubber flooring at minimum 3/4-inch thickness. Vulcanized rubber stall mats (4×6 feet, available from farm supply stores) are the most cost-effective option at $40–$60 per mat. For added protection under the bar during deadlifts, build or buy a dedicated deadlift platform with a plywood base topped with rubber — this absorbs impact far better than flat flooring alone. Avoid foam interlocking tiles as your only flooring; they compress under heavy rack loads and can create an unstable surface.
Do I need a spotter for a home gym?
Not necessarily — but you do need a plan for safe training without one. In a power rack with properly set safety pins or arms, you can bench press and squat to failure safely without a spotter; the safeties catch the bar. On squat stands without a rack, or when bench pressing without safeties, you should either train with a partner, use safety collars that allow you to quickly tip weight off, or keep reps well short of true failure. Avoid ever attempting a true one-rep max on bench or squat without either a reliable rack or a trained spotter present.
What’s the best single piece of equipment for a home gym?
For most people, a quality Olympic barbell combined with a good set of plates is the single most versatile investment. With just a bar and plates, you can squat, deadlift, bench press, overhead press, row, perform cleans, and dozens of variations. If you’re not ready to invest in full barbell training, a set of adjustable dumbbells (like Powerblocks) combined with a pull-up bar covers the majority of movement patterns effectively and in minimal space. Resistance bands are the most affordable single investment with the widest practical utility range.
How do I prevent rust on my home gym equipment?
Rust prevention starts with humidity control. If your gym is in a basement or garage, a dehumidifier is a worthwhile investment — keeping relative humidity below 50% dramatically slows rust development on bare steel. Wipe down barbells and plates with a light coat of 3-in-1 oil or WD-40 every few months. For barbells, use a brass or nylon brush to clean the knurling periodically. Stainless steel bars are rust-resistant by nature but cost significantly more. Chrome-plated and zinc-coated bars offer moderate corrosion resistance at mid-range prices.
Should I buy new or used home gym equipment?
Both have their place in a smart purchasing strategy. Used equipment is excellent for: bumper plates and iron plates (very durable, easy to inspect), hex dumbbells and fixed dumbbell sets, benches (inspect the upholstery and frame carefully), power racks from reputable brands, and kettle bells. Buy new for: Olympic barbells (used bars may be bent or have damaged sleeves — hard to detect), anything with cables or pulleys (wear is hard to assess), foam-padded equipment, and electronics. Facebook Marketplace, Craigslist, and specialty resale sites like Garage Gym Exchange are excellent sources.
What temperature is too cold or too hot for a home gym?
For training performance and comfort, an ambient temperature between 60°F and 75°F (15–24°C) is ideal. Below 55°F (13°C), muscles take longer to warm up, joints may feel stiff, and the risk of muscle strains increases — though this is manageable with an extended warm-up. Above 85°F (29°C), cardiovascular strain increases and sweat rates rise dramatically, which accelerates dehydration and reduces performance. Extreme heat (above 95°F / 35°C) in an unventilated space can present genuine health risks. Equipment itself handles temperature variation well; it’s the human performer who suffers most in temperature extremes.
How do I keep myself motivated training at home without a gym community?
Motivation in a home gym is primarily a systems problem, not a willpower problem. Structure your environment for success: keep the gym clean and organized, establish fixed training times and treat them as non-negotiable appointments, track every session in a log, set 8–12 week goals with clear metrics, and join online communities (Reddit’s r/homegym is excellent) for social accountability. Some people find a training partner who comes to their home gym brings the best of both worlds. Periodic “benchmark tests” — like a 1RM test, a fitness challenge, or a before-and-after photo — provide natural motivation checkpoints throughout the year.
Conclusion: Start Small, Build Smart, Train Consistently
Building a home gym is one of the best investments you can make in your long-term health and fitness — but only if you approach it with intention. The goal isn’t to replicate a commercial gym in your garage; it’s to create the exact training environment that removes every possible excuse not to show up and do the work.
Start with the fundamentals: a solid barbell and rack, quality flooring, and a clear program. Train in that setup consistently before adding anything else. Let your real training experience — not YouTube videos or gym influencer setups — guide your equipment decisions. Buy quality where it matters (barbell, rack, flooring), save money where it doesn’t (accessories, storage solutions), and use the used equipment market aggressively.
A home gym isn’t a destination. It’s a platform that grows with your fitness, your goals, and your life. The person who trains in a 10×10 garage with a barbell and a set of plates three days per week for five years will outperform nearly anyone who trains inconsistently in the most beautiful gym in the world. The equipment is there to serve your consistency, not replace it.
Now stop planning and start building. Your future self is waiting.
Ready to Build Your Home Gym?
Explore our expert equipment reviews, comparison guides, and training resources to make every purchase count.
Browse All-in-One Home Gym Reviews →